Install the plugin, paste two keys, and you are live.
BasketBooster ships a plugin for WooCommerce and an extension for OpenCart 4 and OpenCart 3.0.x. Each one syncs your catalog, tracks what shoppers do and places the recommendation widgets on your product, cart and home pages. You do not edit your theme or write any code.
30 days free · No credit card · Set up in about ten minutes
WooCommerce plugin
A normal WordPress plugin. Upload the zip, activate it and paste your keys under WooCommerce > BasketBooster. Widgets, shortcodes and Gutenberg blocks included.
Set up WooCommerceOpenCart 4OpenCart 4 extension
An OpenCart module in the standard ocmod format. Install it from the Extension Installer and it places itself on your layouts for you.
Set up OpenCart 4OpenCart 3.0.xOpenCart 3.0.x extension
The same features as the OpenCart 4 build, packaged for 3.0.x stores. A few admin screens look different, and this guide shows what to expect.
Set up OpenCart 3On Shopify? You do not need a plugin. Install the BasketBooster app from the Shopify App Store and it sets everything up inside your theme. Open it on the Shopify App Store →
Your two keys from the dashboard.
Every plugin asks for the same two things: a publishable key the widgets use in the shopper’s browser, and a secret key your store uses on the server to sync the catalog. Both come from your BasketBooster dashboard.
- 1
Create an account and pick your platform
Sign up at dashboard.basketbooster.eu. The trial runs 30 days and does not ask for a card. On the Home page, choose WooCommerce or OpenCart. The setup hub then lists the steps for that platform and the download link for the plugin.
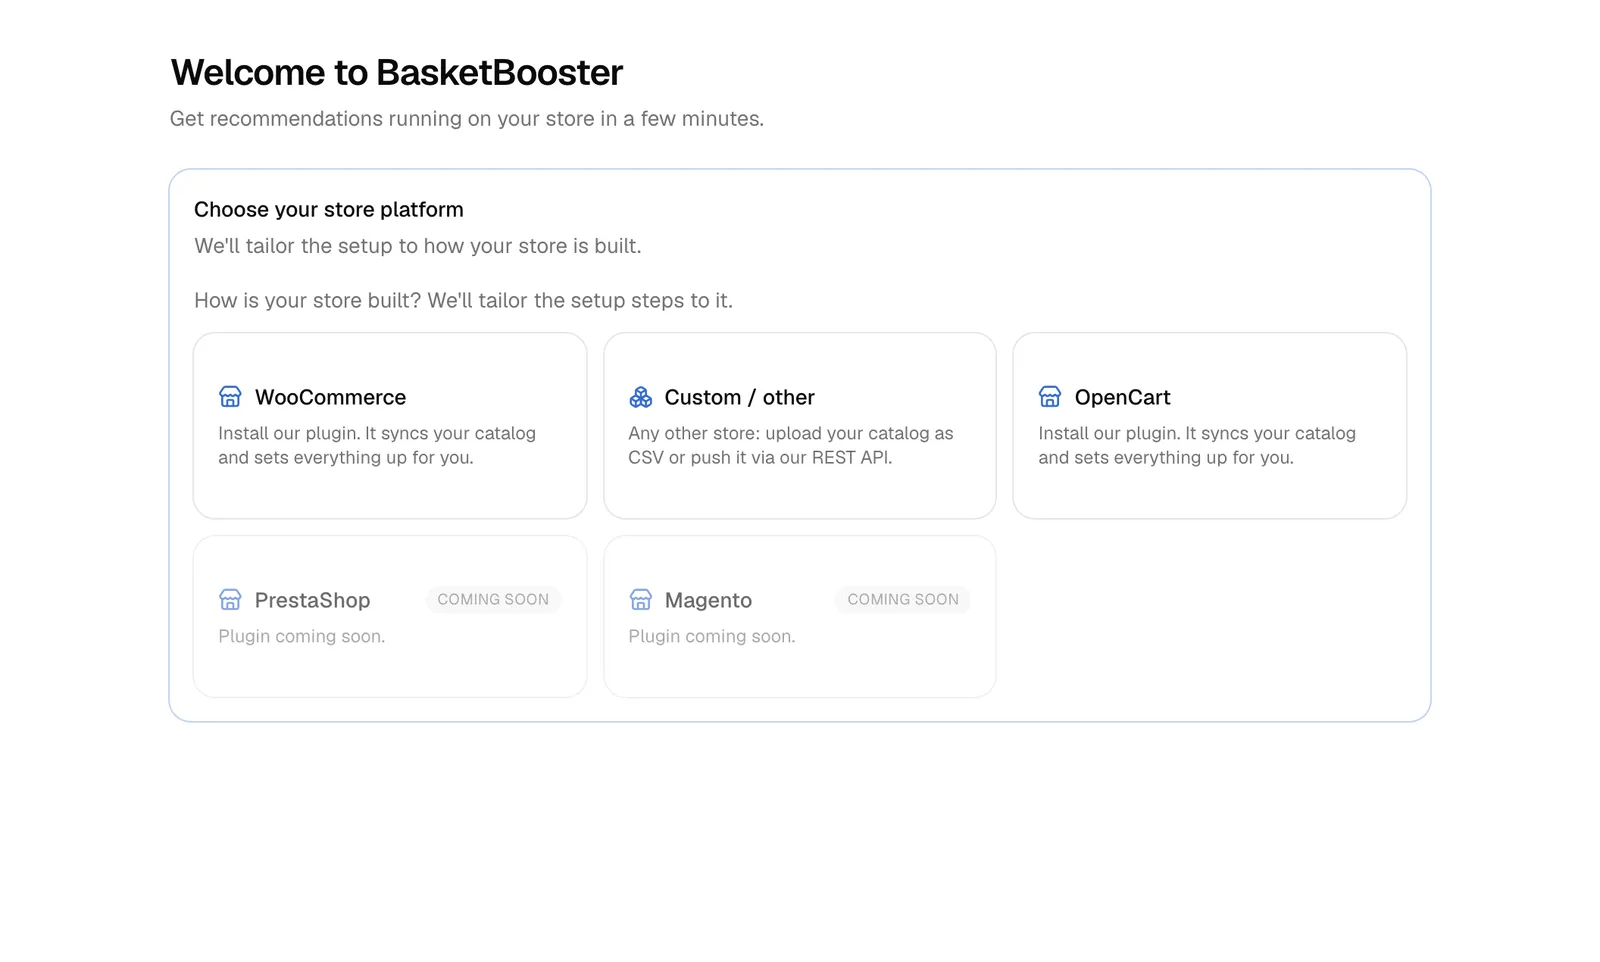
Dashboard > Home: the platform picker. - 2
Copy the publishable key
The setup hub shows it under step 2, and it is also on the Recommender > Widget page in the embed snippet. It starts with
pk_and is safe to put in a web page: it only lets the widgets read recommendations.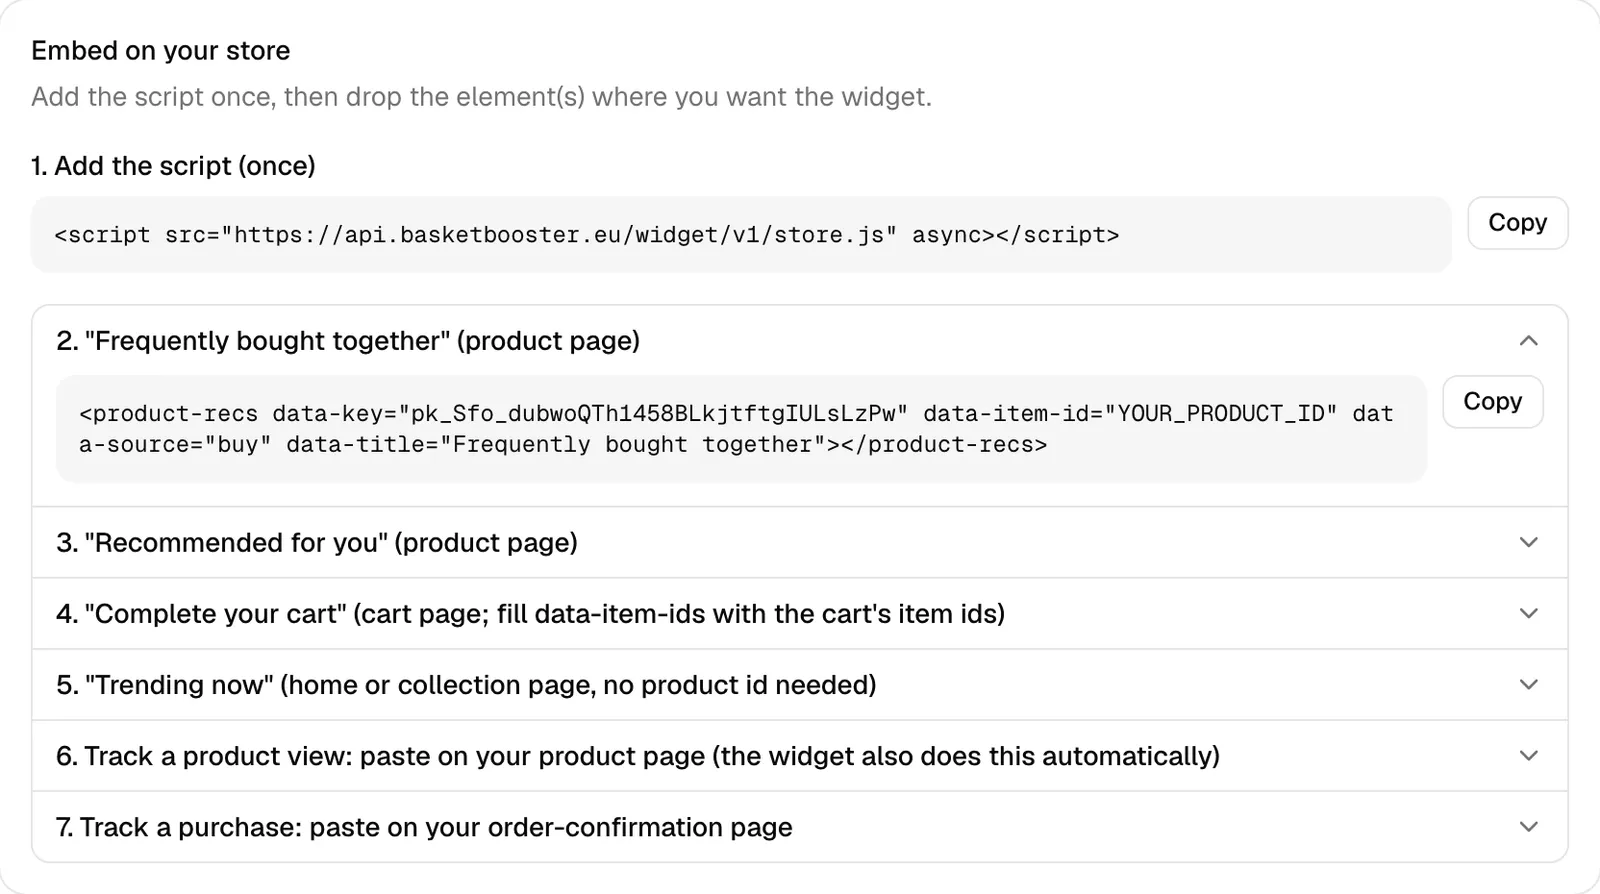
Recommender > Widget: the publishable key sits in the embed snippet. - 3
Create a secret API key
Click Generate secret key in the setup hub, or go to API Keys, give the key a label and click Create key. The full key is shown once, so copy it right away. The plugin keeps it on your server and never sends it to shoppers.
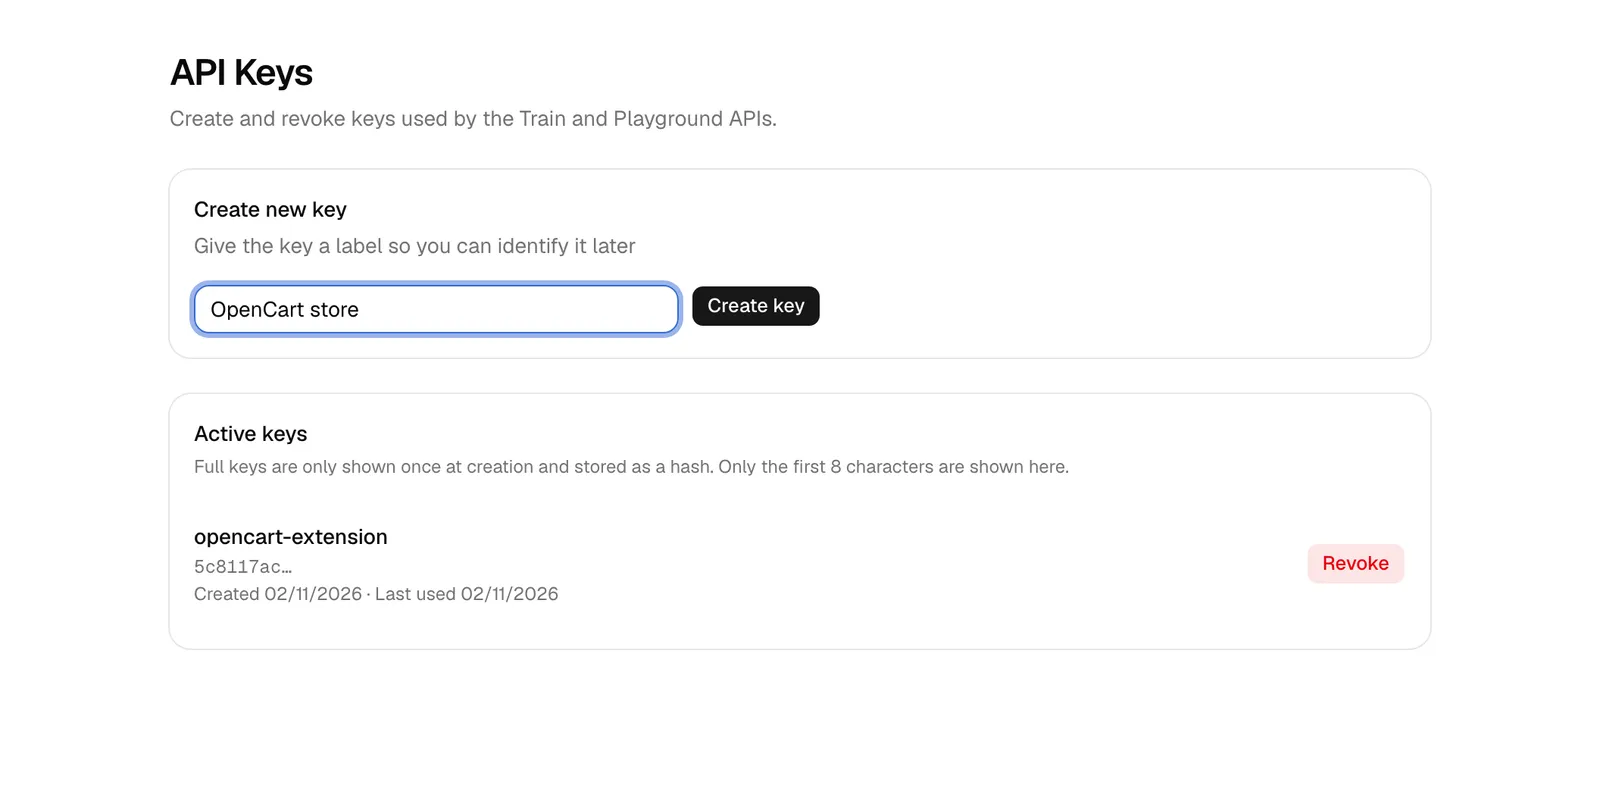
API Keys: one key per store, shown once.
Set up the WooCommerce plugin.
The plugin syncs your WooCommerce catalog, tracks views, add-to-carts and purchases, and places the widgets on product, cart and shop pages on its own. Shortcodes and Gutenberg blocks cover any other spot.
Download the plugin zip:
https://api.basketbooster.eu/plugin/basketbooster-recommender.zipThe same link is on your dashboard’s Home page once you pick WooCommerce as your platform.
Step by step
- 1
Upload and activate
In wp-admin open Plugins > Add New Plugin > Upload Plugin. Choose the zip, click Install Now, then Activate. If you prefer the command line:
wp plugin install basketbooster-recommender.zip --activate.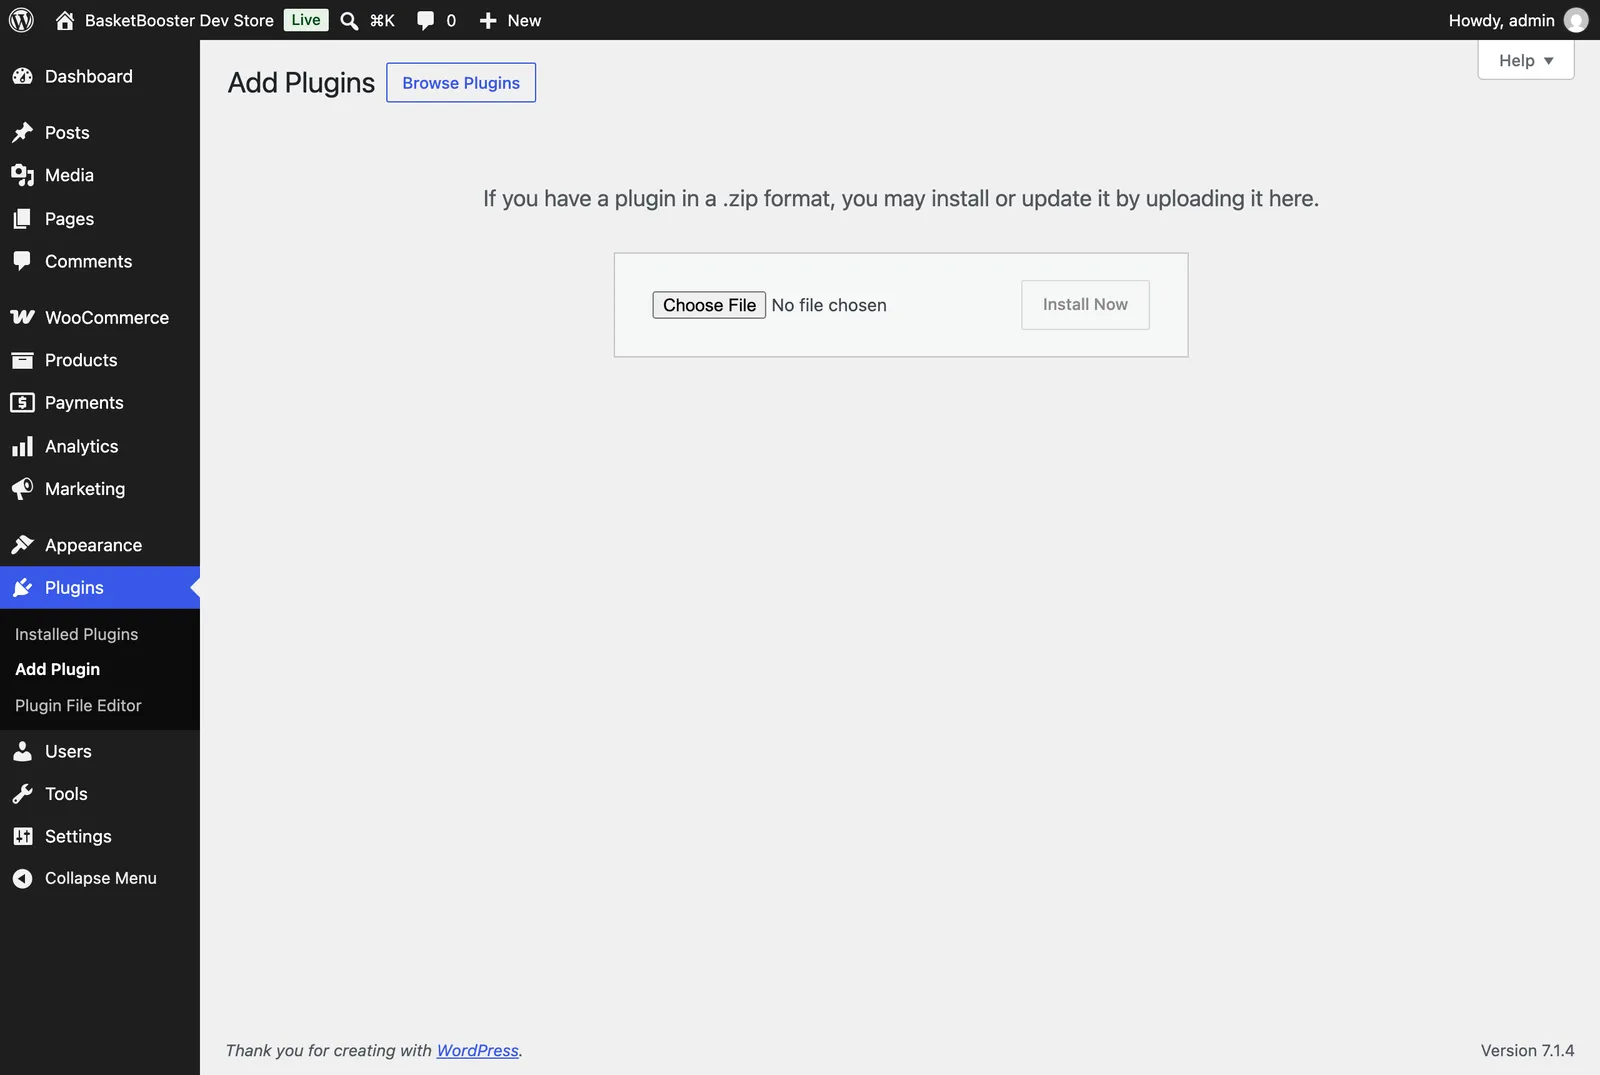
Plugins > Add New Plugin > Upload Plugin. - 2
Paste the two keys
Open WooCommerce > BasketBooster. Leave the API base URL at
https://api.basketbooster.eu, paste the publishable key and the secret API key, and save.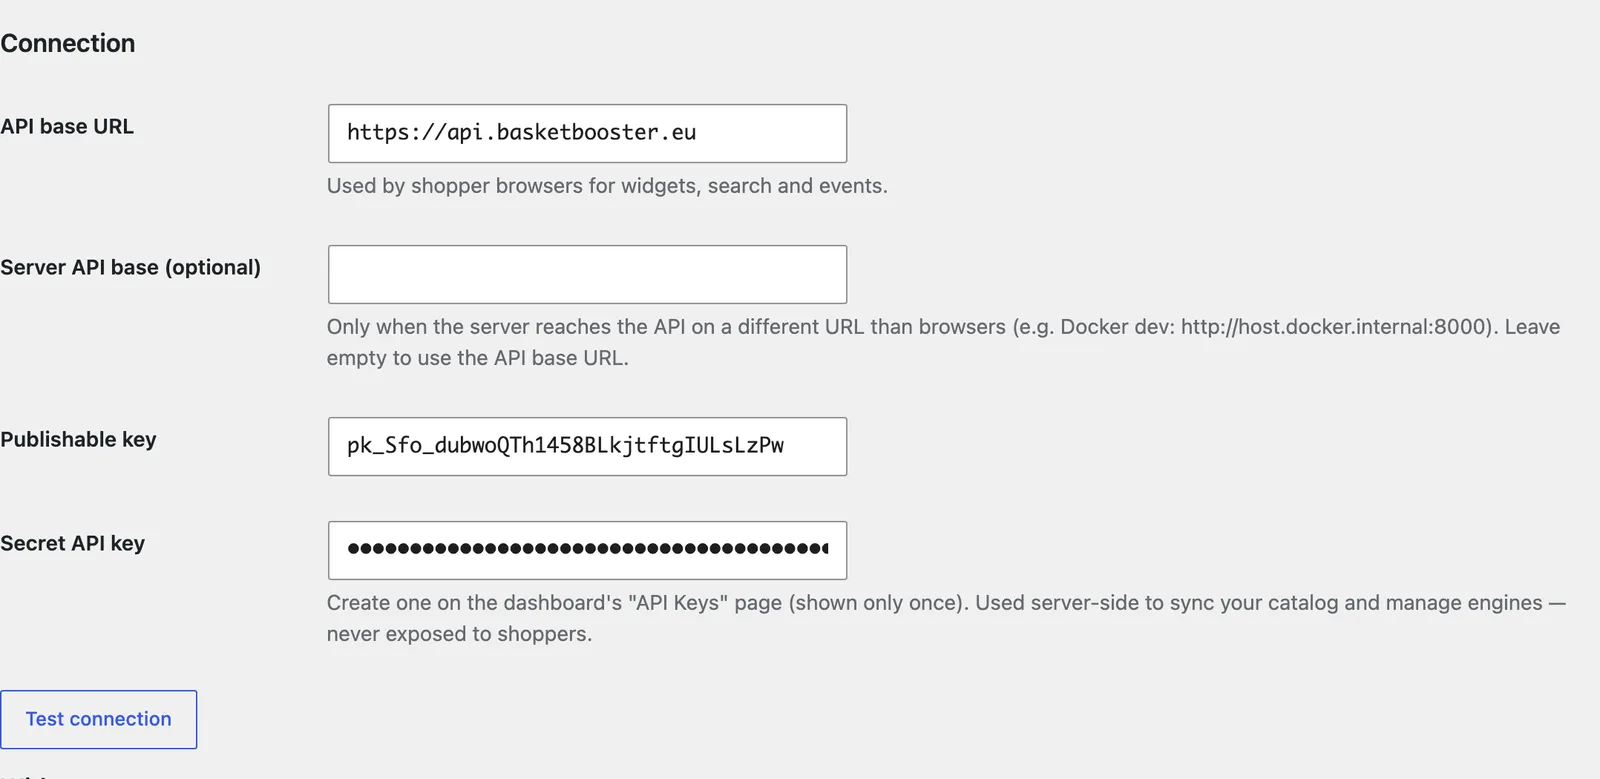
WooCommerce > BasketBooster: the Connection section. - 3
Test the connection
Click Test connection. A green result means both keys work. The test also registers the plugin with your account, so the setup steps on your dashboard’s Home page tick themselves off.
- 4
Sync your catalog
Scroll to Catalog sync and click Sync now. The plugin pushes every product (title, image, price, categories, brand, attributes, stock, URL) and BasketBooster builds the search index and the recommendation engines from it. After the first sync, product changes in WooCommerce are sent on their own.
The same section shows engine status (catalog items, last sync, last trained) and the Sync catalog to engines and Train now buttons, useful after a big import.
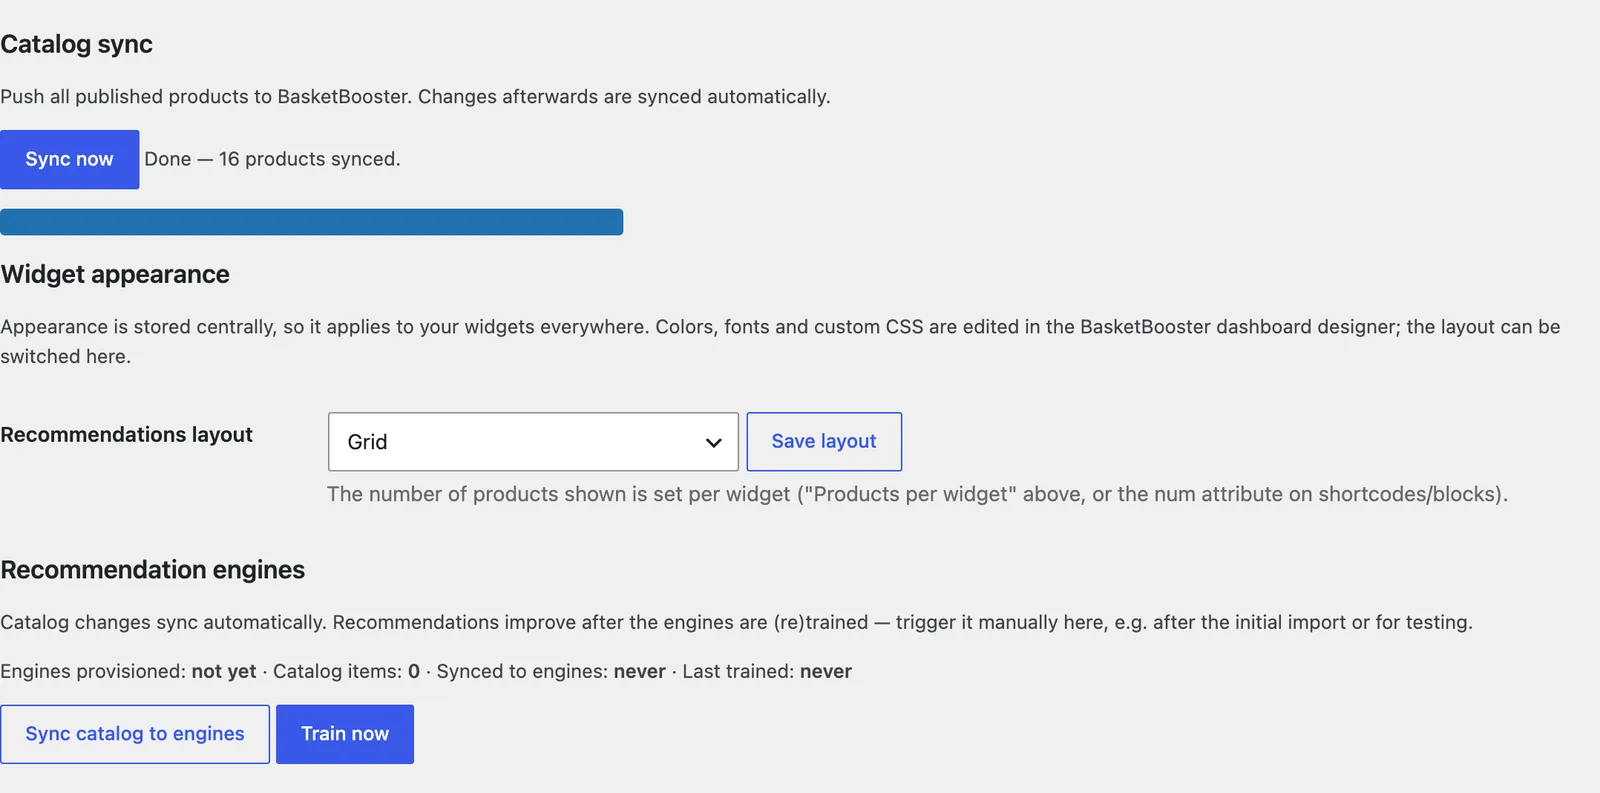
Catalog sync: the first sync takes a minute on a typical store. - 5
Check a product page
Open any product in your store. The “You may also like” grid appears under the product details. The shop page shows trending products, and the cart page shows “Frequently bought together” once your orders have trained that engine.
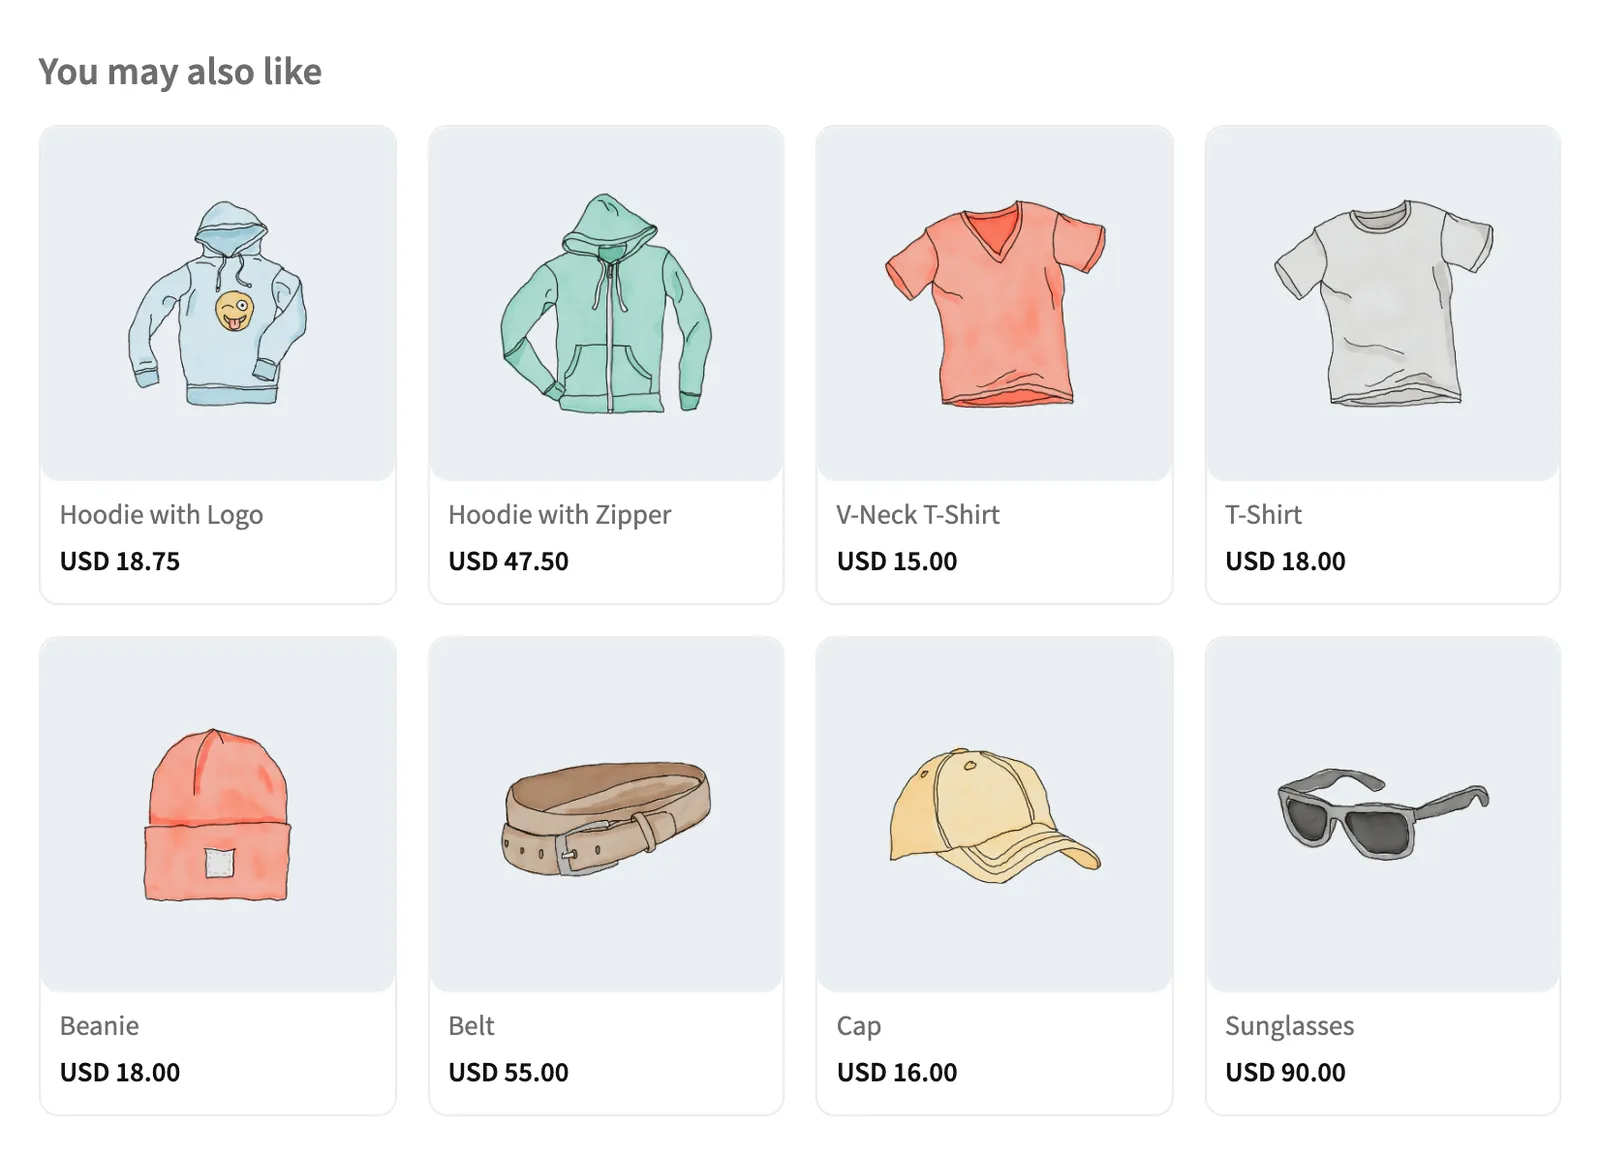
The widget on a product page, in the plugin’s grid layout.
Where the widgets appear
Once connected, the plugin places the widgets for you. Each placement has its own checkbox under Automatic placements.
Product pages
“You may also like” for the product being viewed, plus Frequently Bought Together once there is order data. WooCommerce’s own Related products block is hidden so there are not two similar grids (you can keep it with a checkbox).
Cart page
“Frequently bought together” based on what is in the basket, right before checkout.
Shop and front page
Trending products for the whole store.
Category pages
Off by default. Trending products of the category being viewed, titled “Trending in {category}”.
Anywhere else
Use the shortcodes [basketbooster_recommendations], [basketbooster_trending category="t-shirts"] and [basketbooster_search], or the BasketBooster Gutenberg blocks. Each accepts layout="grid|carousel".
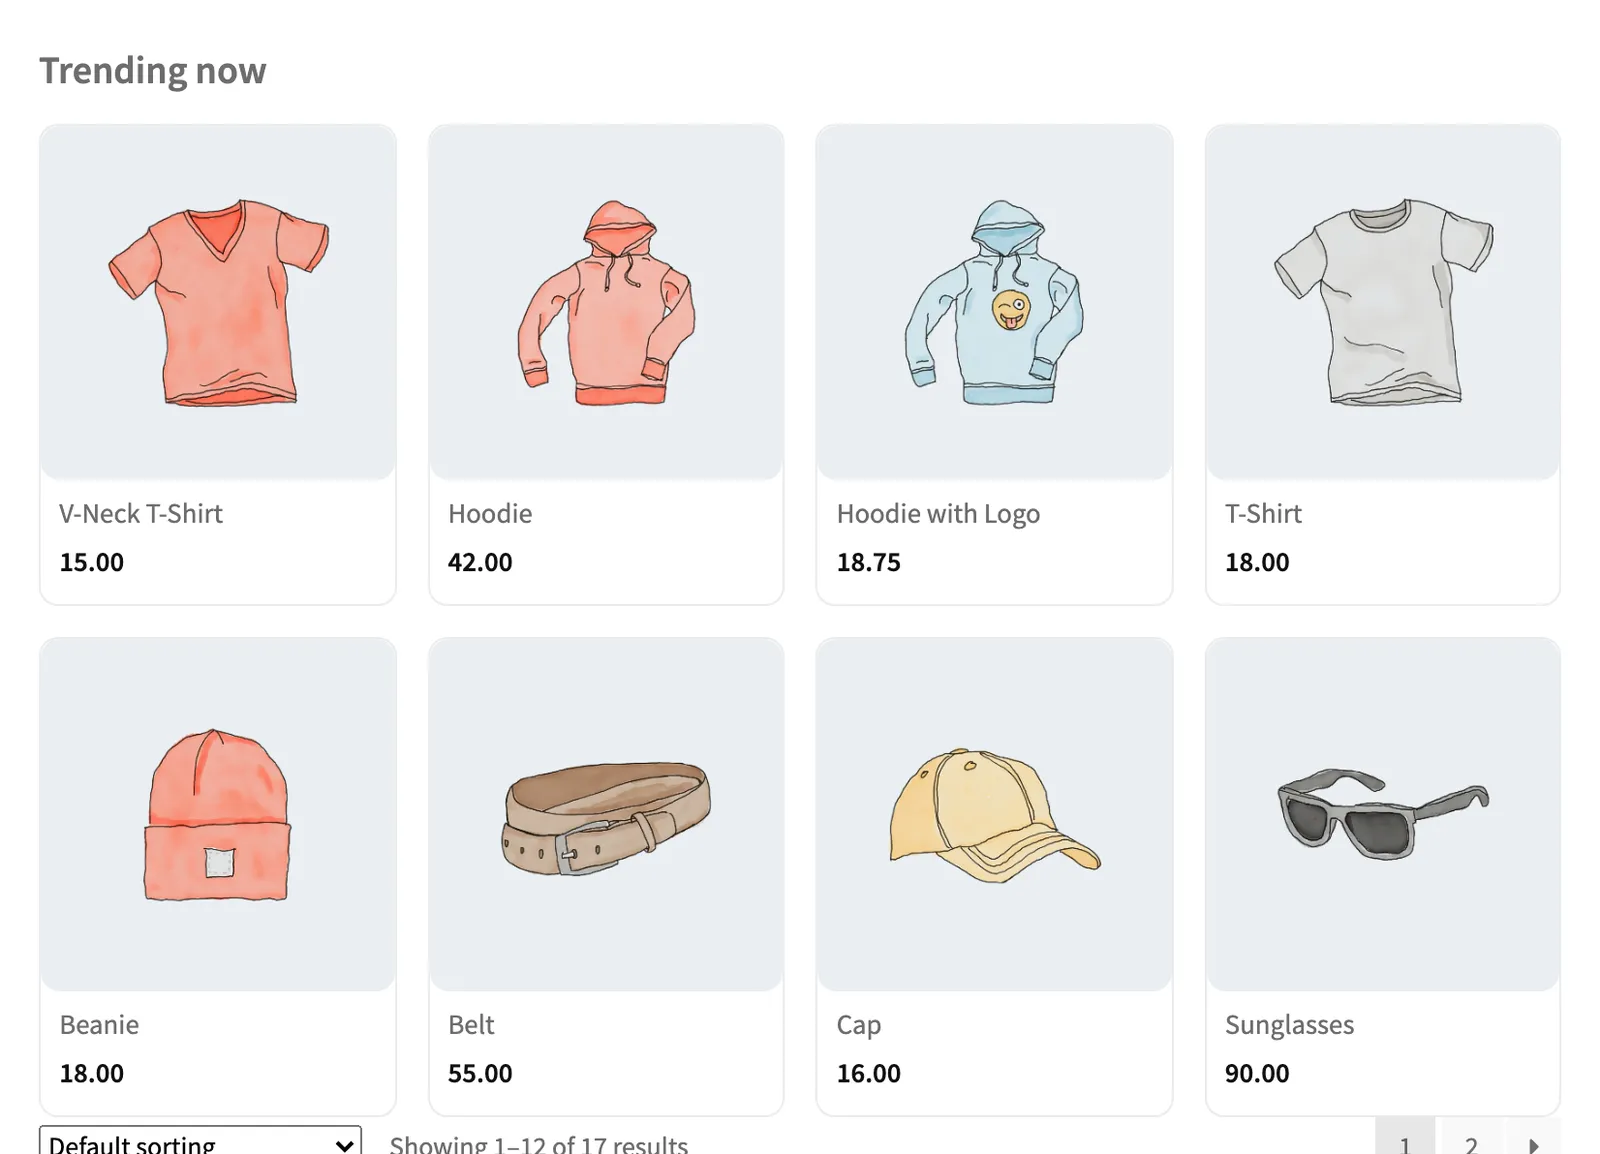
Settings that control them
Everything lives on one page under WooCommerce > BasketBooster. Colors, fonts and custom CSS are edited in the dashboard designer and apply to every store the moment you save.
{category} is replaced with the category name.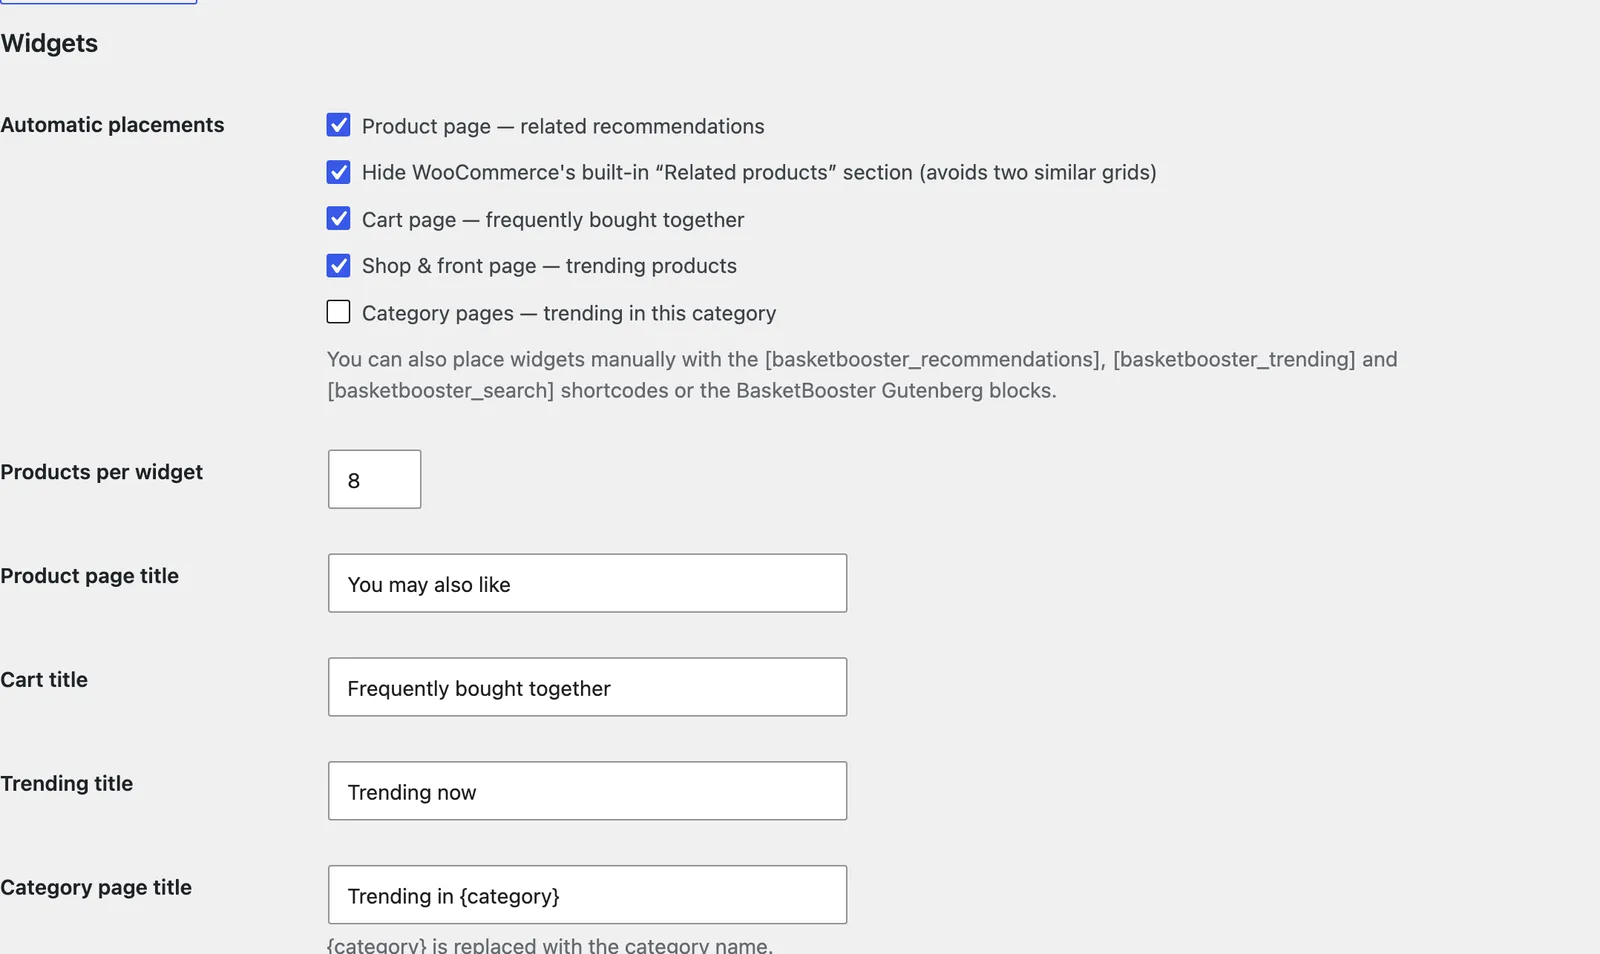
Set up the OpenCart 4 extension.
The extension is one OpenCart module that shows different things depending on the page it is placed on. It syncs your catalog, tracks shopper events and adds itself to the product, cart, home and order success layouts for you.
Download the extension zip:
https://api.basketbooster.eu/plugin/basketbooster.ocmod.zipThe same link is on your dashboard’s Home page once you pick OpenCart as your platform.
Step by step
- 1
Upload the zip in the Extension Installer
In the OpenCart admin open Extensions > Installer, click the blue upload button, choose the zip and wait for the progress bar. Then click the green install button next to BasketBooster Recommender in the list.
To update later, uninstall the old version in the Installer first, then upload the new zip.
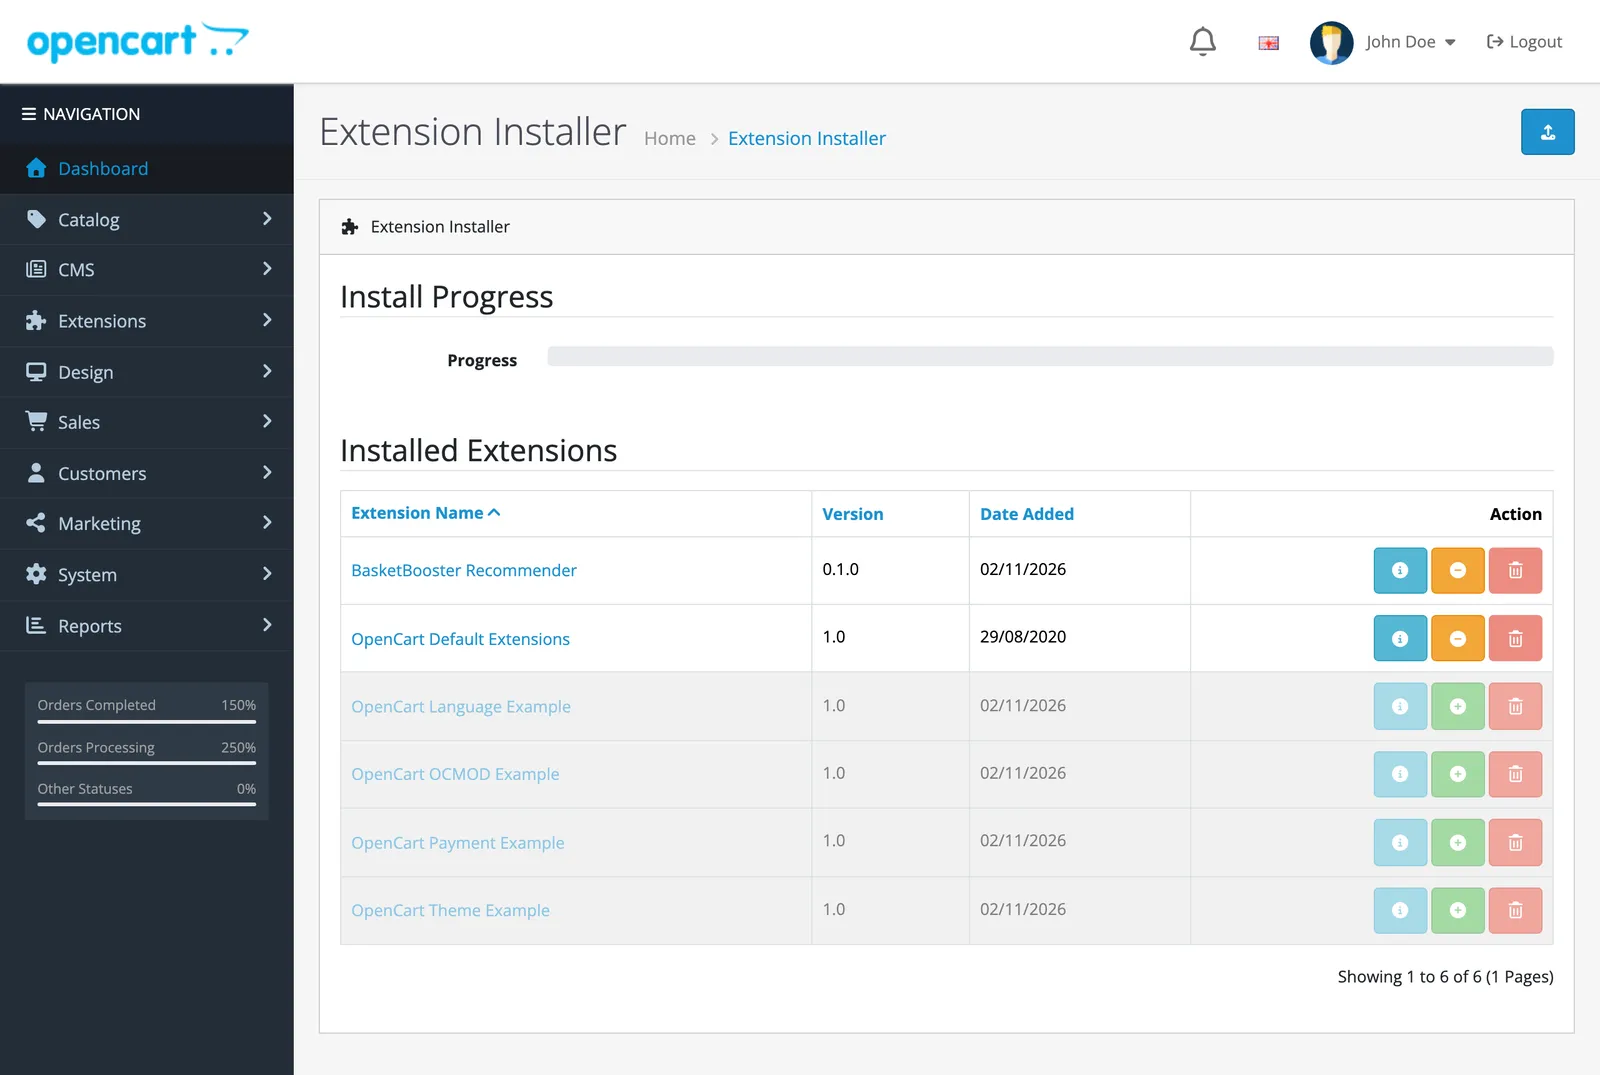
Extensions > Installer after the upload. - 2
Install the module
Open Extensions > Extensions, choose Modules from the extension type list and find BasketBooster Recommender. Click the green install button, then the blue pencil to open the settings page.
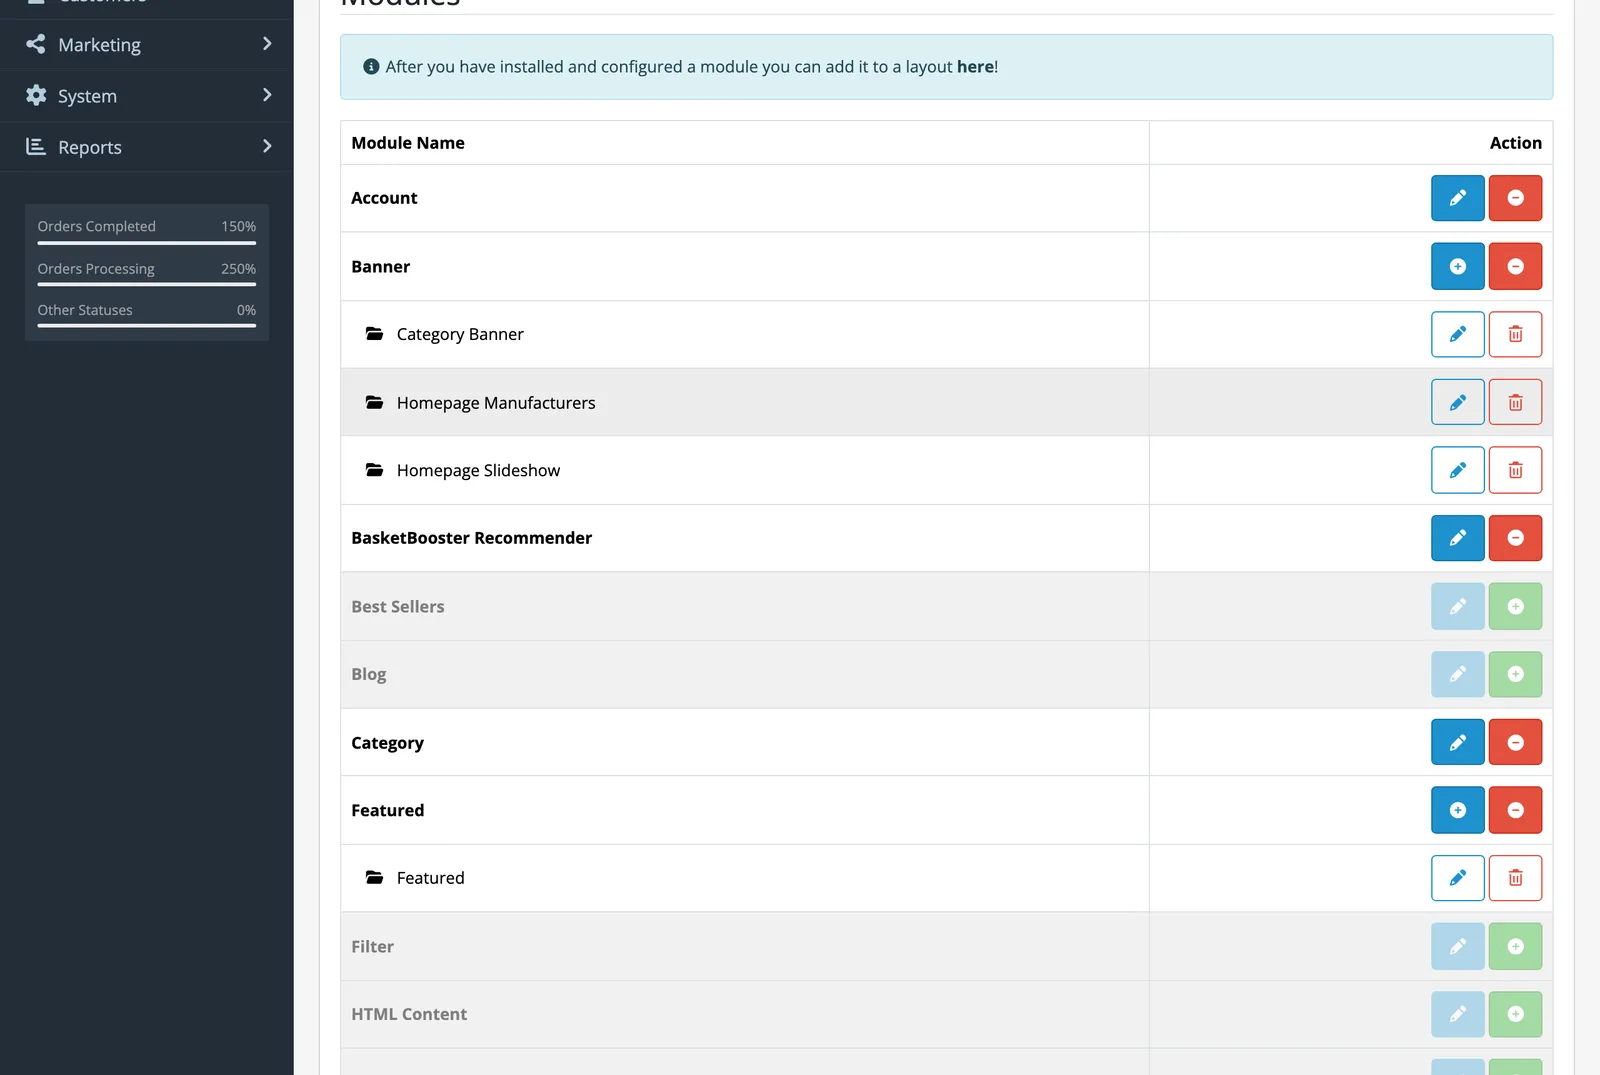
Extensions > Extensions > Modules. - 3
Paste the two keys
Switch Status on, leave the API base URL at
https://api.basketbooster.eu, paste the publishable key and the secret API key, and save with the blue button at the top right.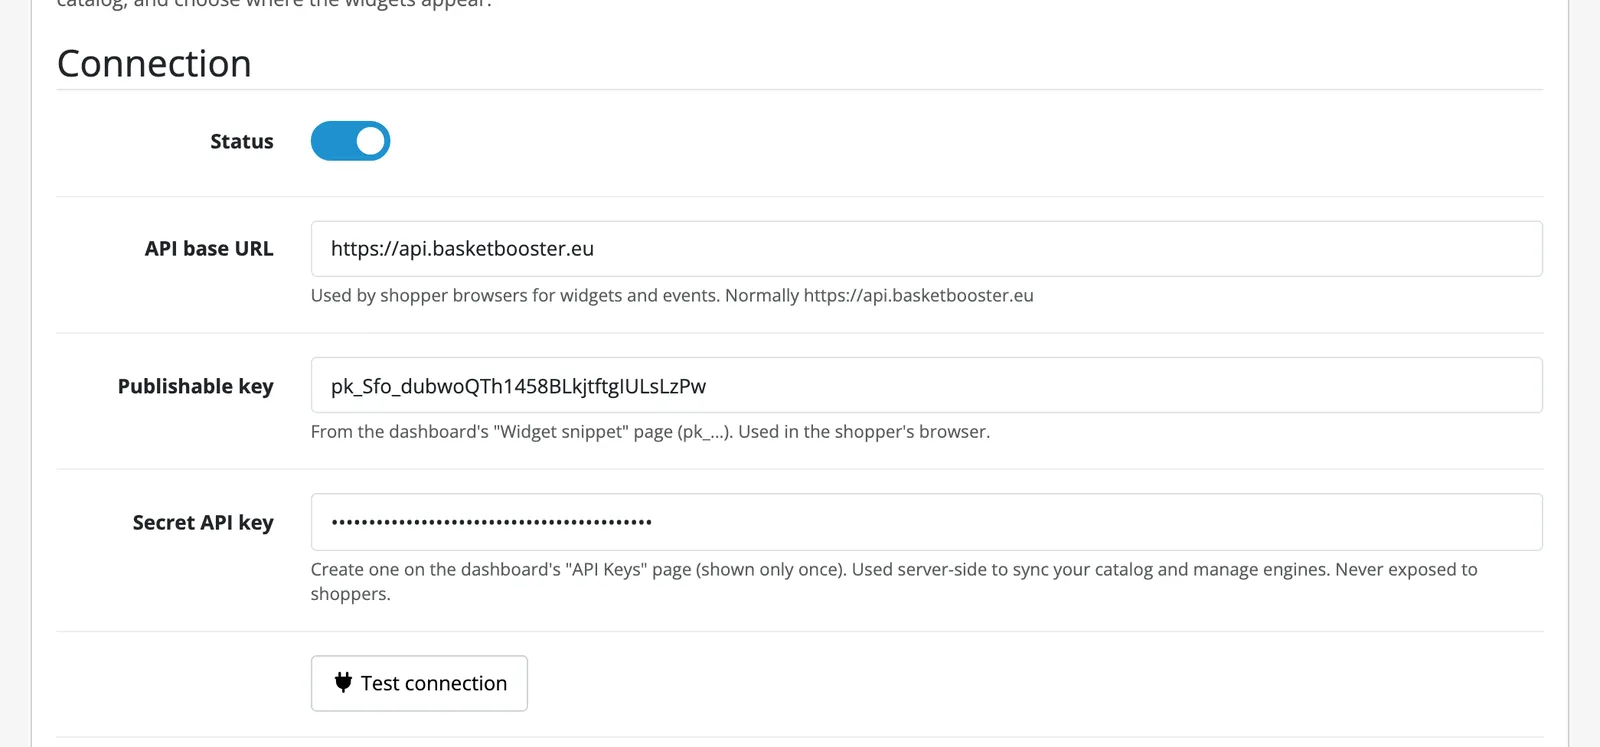
The Connection section of the module settings. - 4
Test the connection
Click Test connection. A green result means both keys work. The test also registers the extension with your account, so the setup steps on your dashboard’s Home page tick themselves off.
- 5
Sync your catalog
Scroll to Catalog sync and click Sync now. The extension pushes every enabled product of your default store (name, image, price as shoppers see it, categories, manufacturer, attributes and options, stock, SKU or model, URL). After that, saving a product in the admin syncs it right away, and disabling or deleting one removes it.
Variants (products with a master product) are synced as their own items. Only the default store is synced.
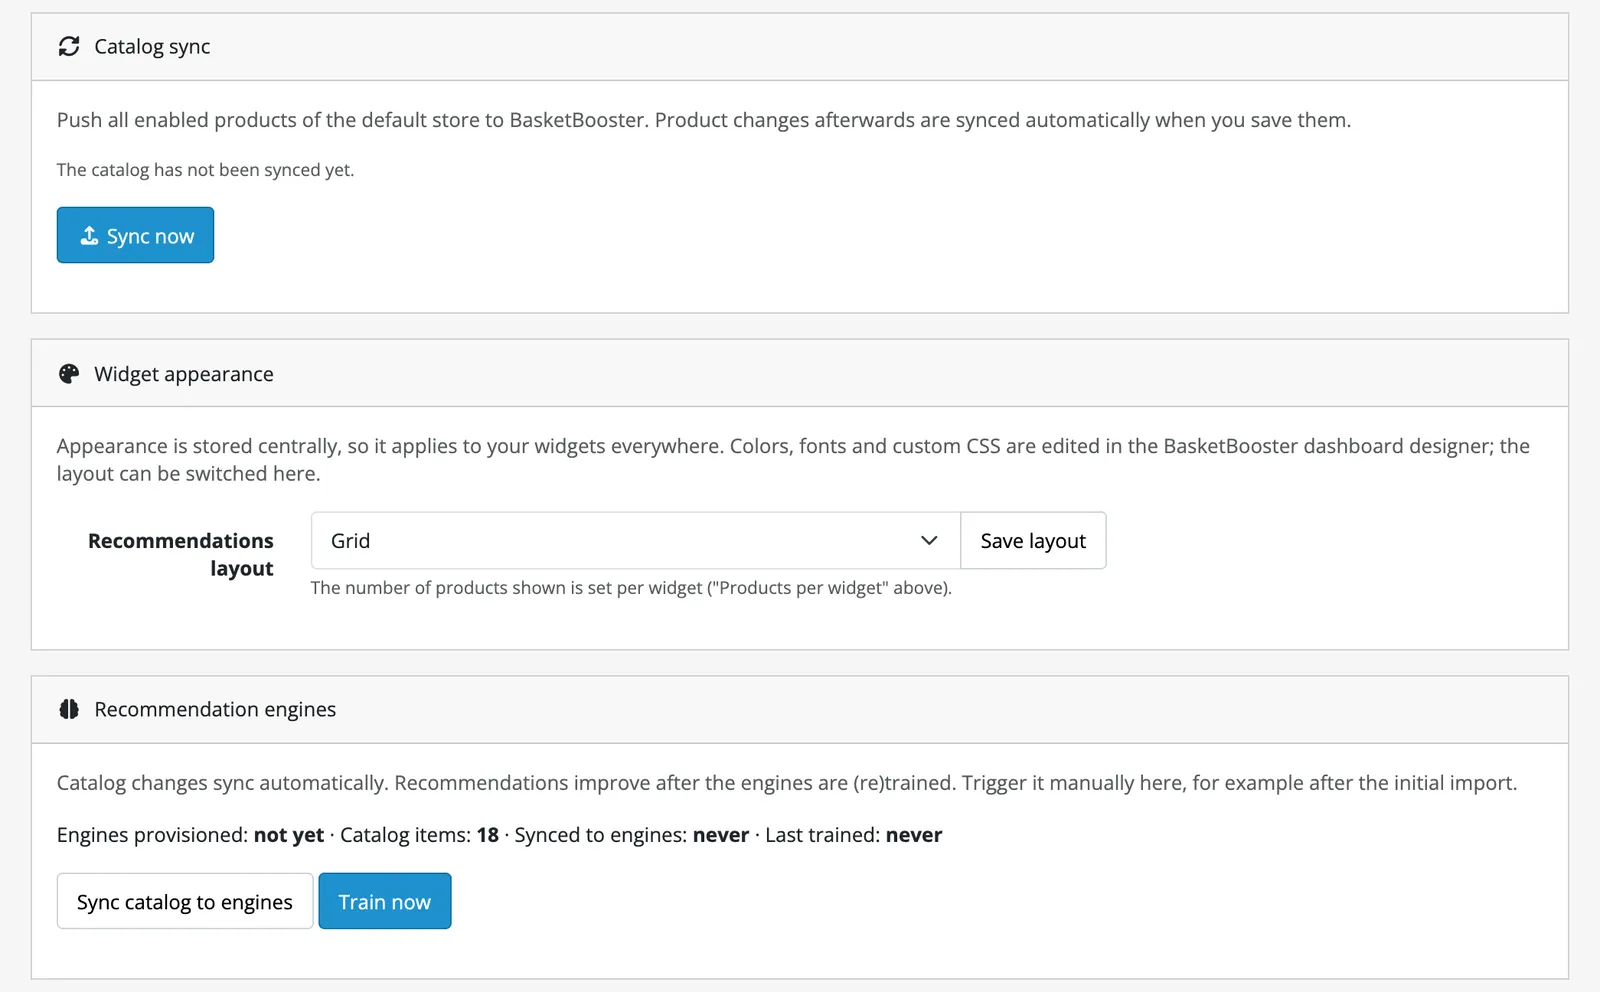
Catalog sync, layout and engine controls. - 6
Check a product page
Open any product in your store. The “You may also like” grid appears under the product details, where OpenCart’s own Related Products used to be. The home page shows trending products.
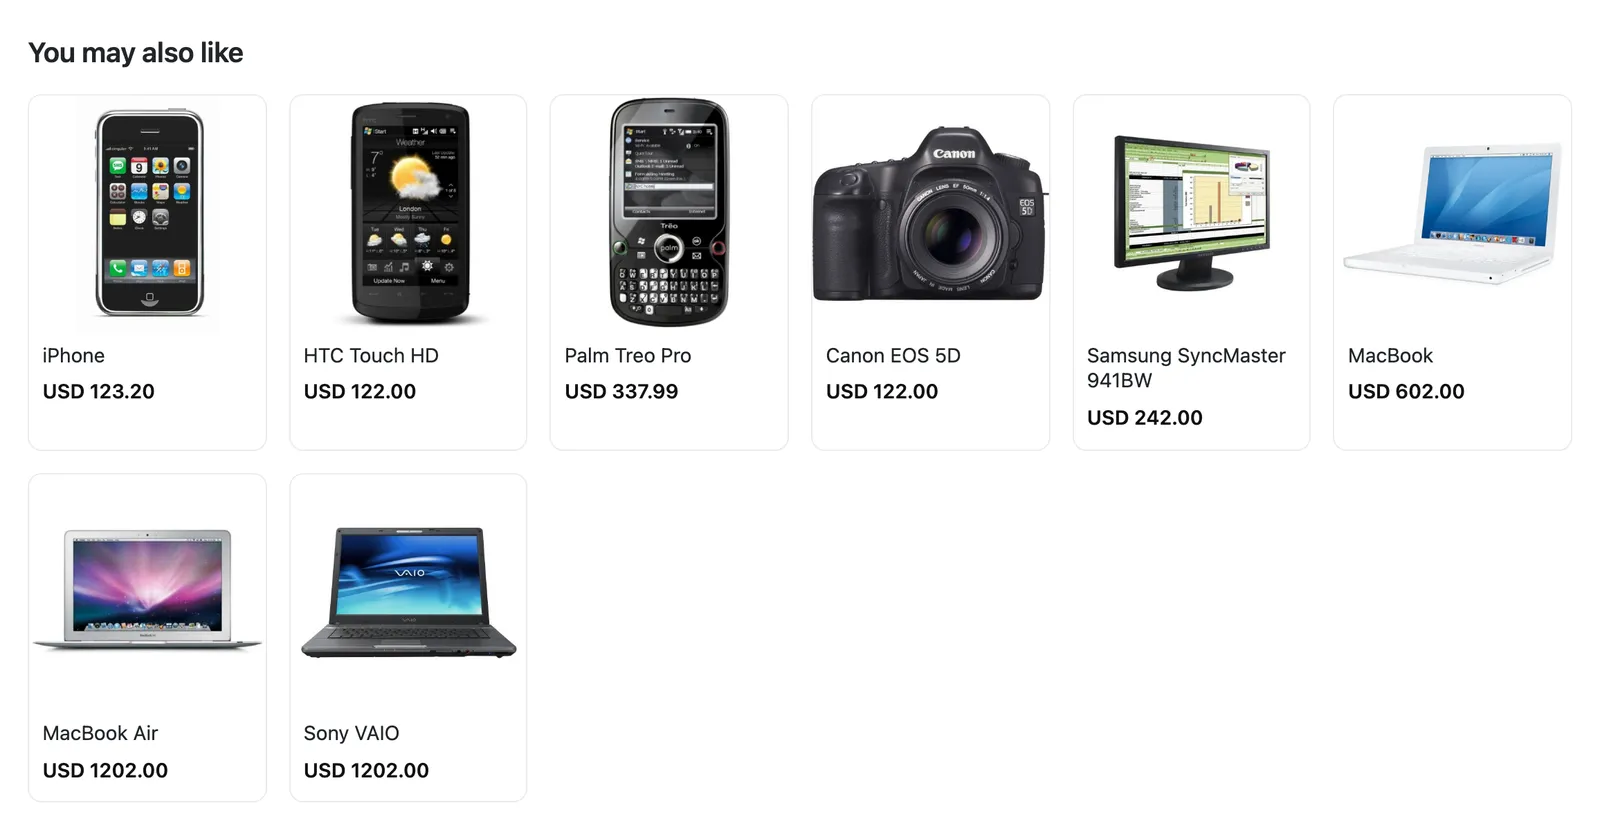
The widget on an OpenCart 4 product page.
Where the widgets appear
The Automatic placements checkboxes put the module on the matching layouts under Design > Layouts for you, at the position you choose (content top or bottom, left or right column).
Product pages
“You may also like” for the viewed product. OpenCart’s built-in Related Products section is hidden so there are not two similar grids (a checkbox keeps it).
Cart page
“Frequently bought together”, seeded by the last item added to the basket.
Home page
Trending products for the whole store.
Category pages
Off by default. Trending products of the viewed category, titled “Trending in {category}”.
Order success page
Trending products as a post-purchase placement.
Any other layout
Add “BasketBooster Recommender” to a layout by hand under Design > Layouts and it shows trending products there. For a custom theme spot, drop a <product-recs> element into a Twig template.
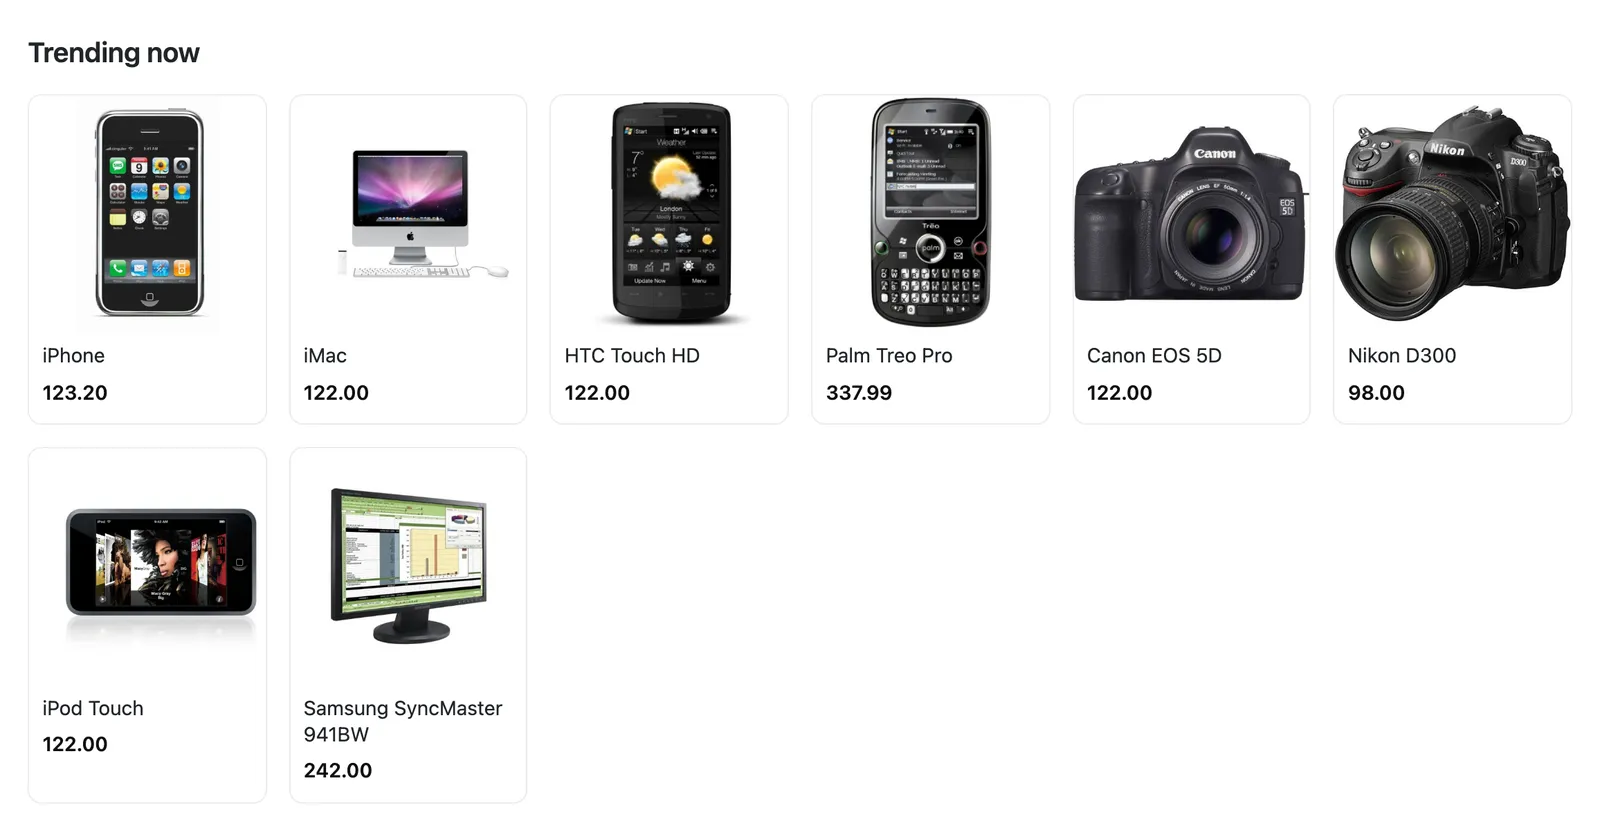
Settings that control them
Everything is on the module settings page under Extensions > Extensions > Modules > BasketBooster Recommender. Colors, fonts, headings and custom CSS are edited in the dashboard designer and apply live.
{category} is replaced with the category name.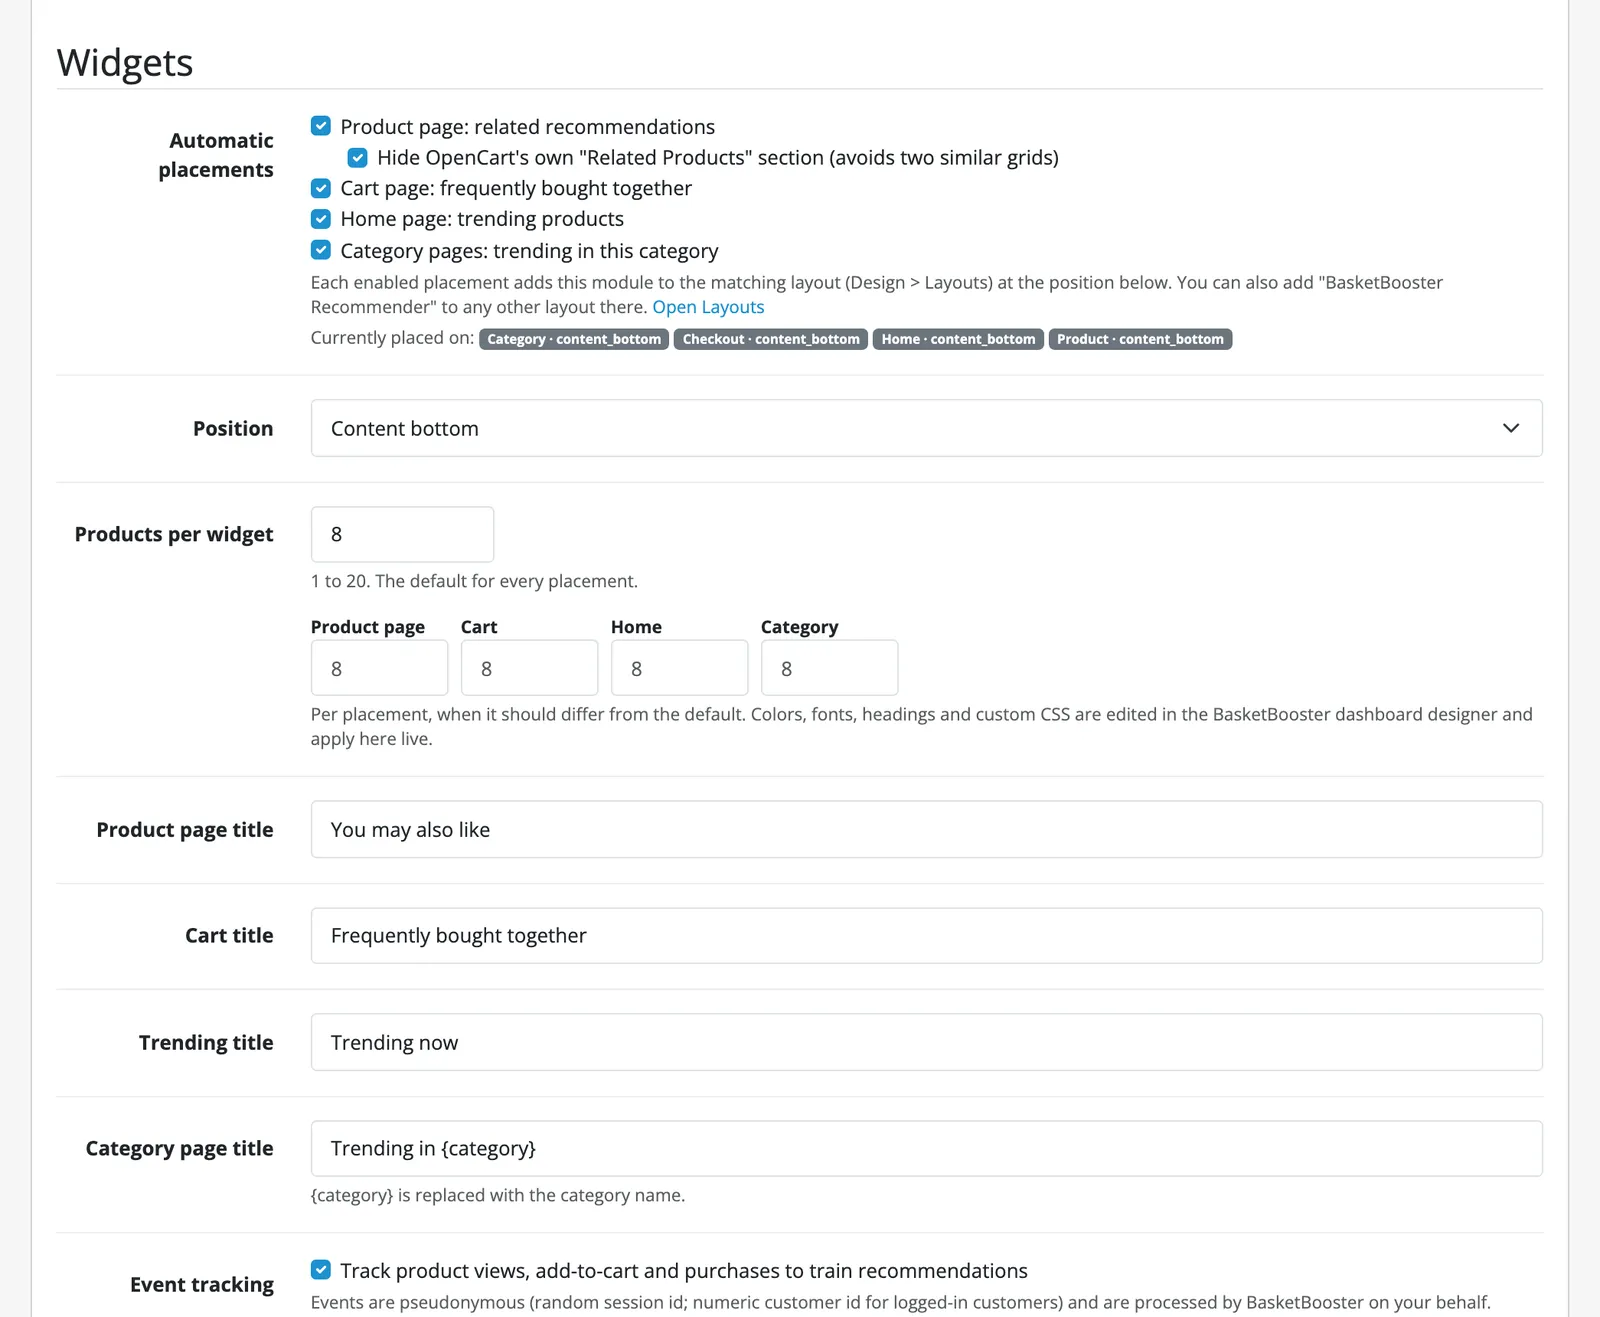
Set up the OpenCart 3.0.x extension.
OpenCart 3 stores are still common, so the extension also ships as a 3.0.x build with the same settings page, sync, widgets and customer events. The install screens look a little different, and this guide follows them.
Download the extension zip:
https://api.basketbooster.eu/plugin/basketbooster-oc3.ocmod.zipThe same link is on your dashboard’s Home page, next to the OpenCart 4 one, once you pick OpenCart as your platform.
Step by step
- 1
Upload the zip in the Extension Installer
In the OpenCart admin open Extensions > Installer, click Upload, choose the zip and wait for the progress bar to finish. The zip uses the standard
upload/layout, so the files are copied straight into your store.To update later, upload the new zip and install the module again. Your settings are kept.
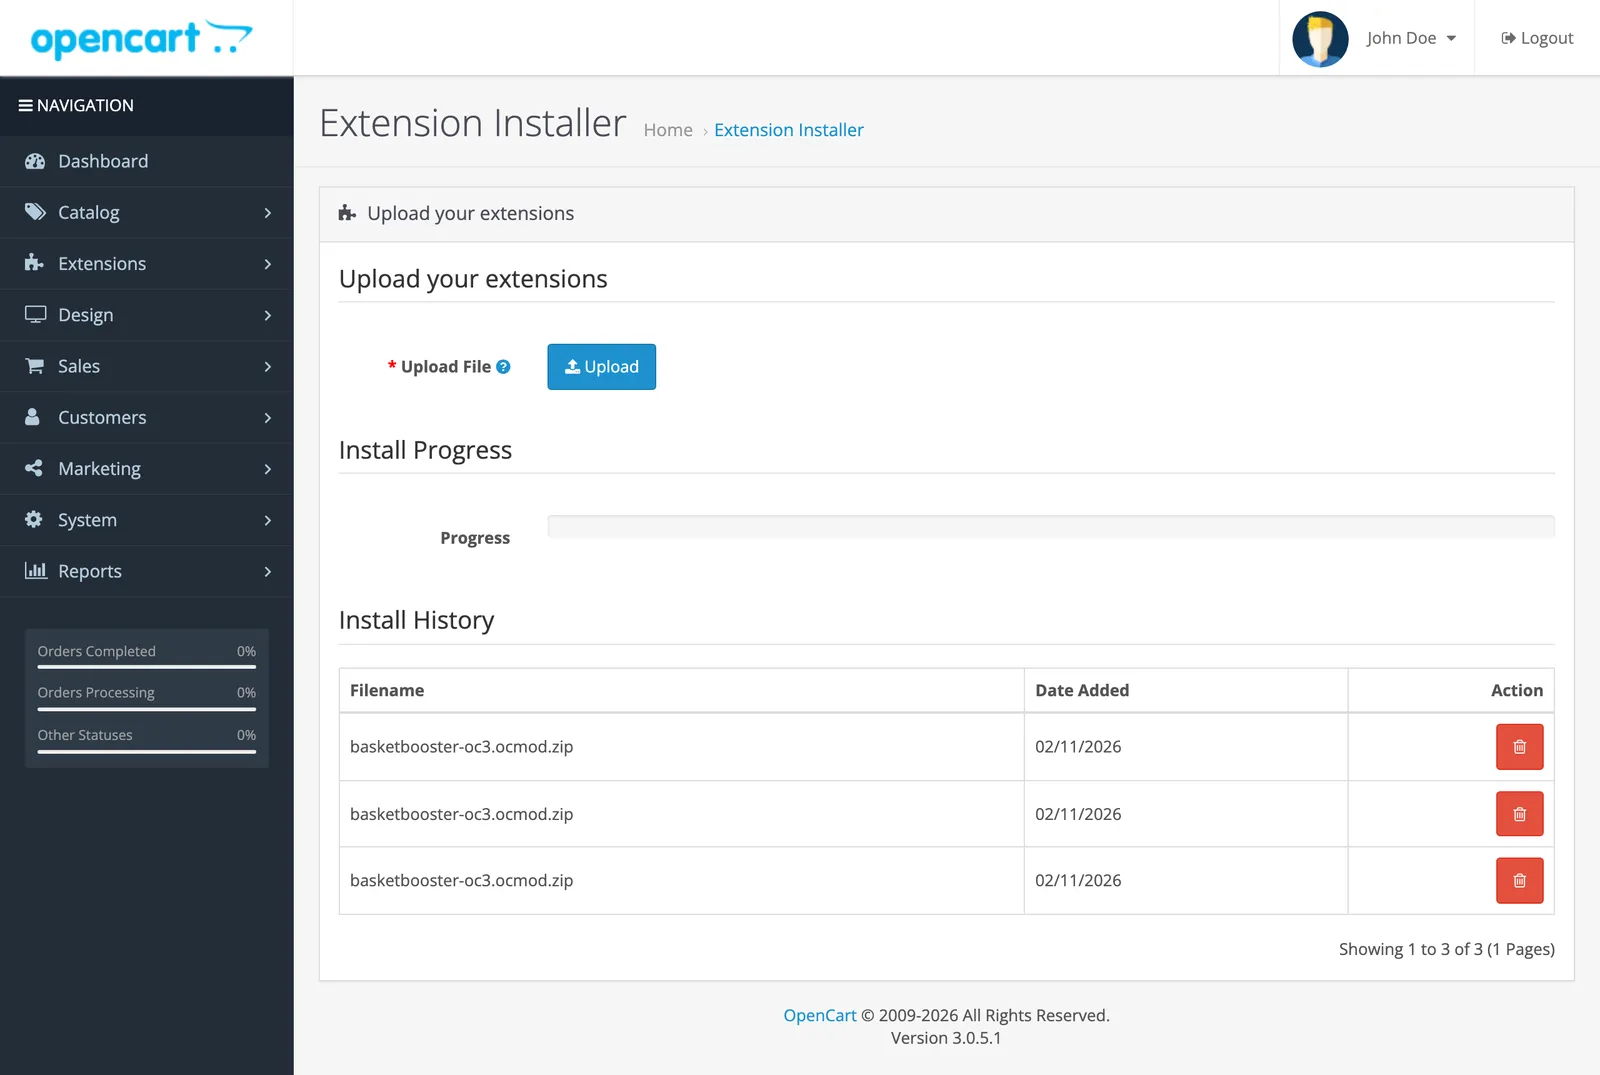
Extensions > Installer on OpenCart 3. - 2
Install the module
Open Extensions > Extensions, choose Modules and find BasketBooster Recommender. Click the green install button, then the blue pencil to open the settings page.
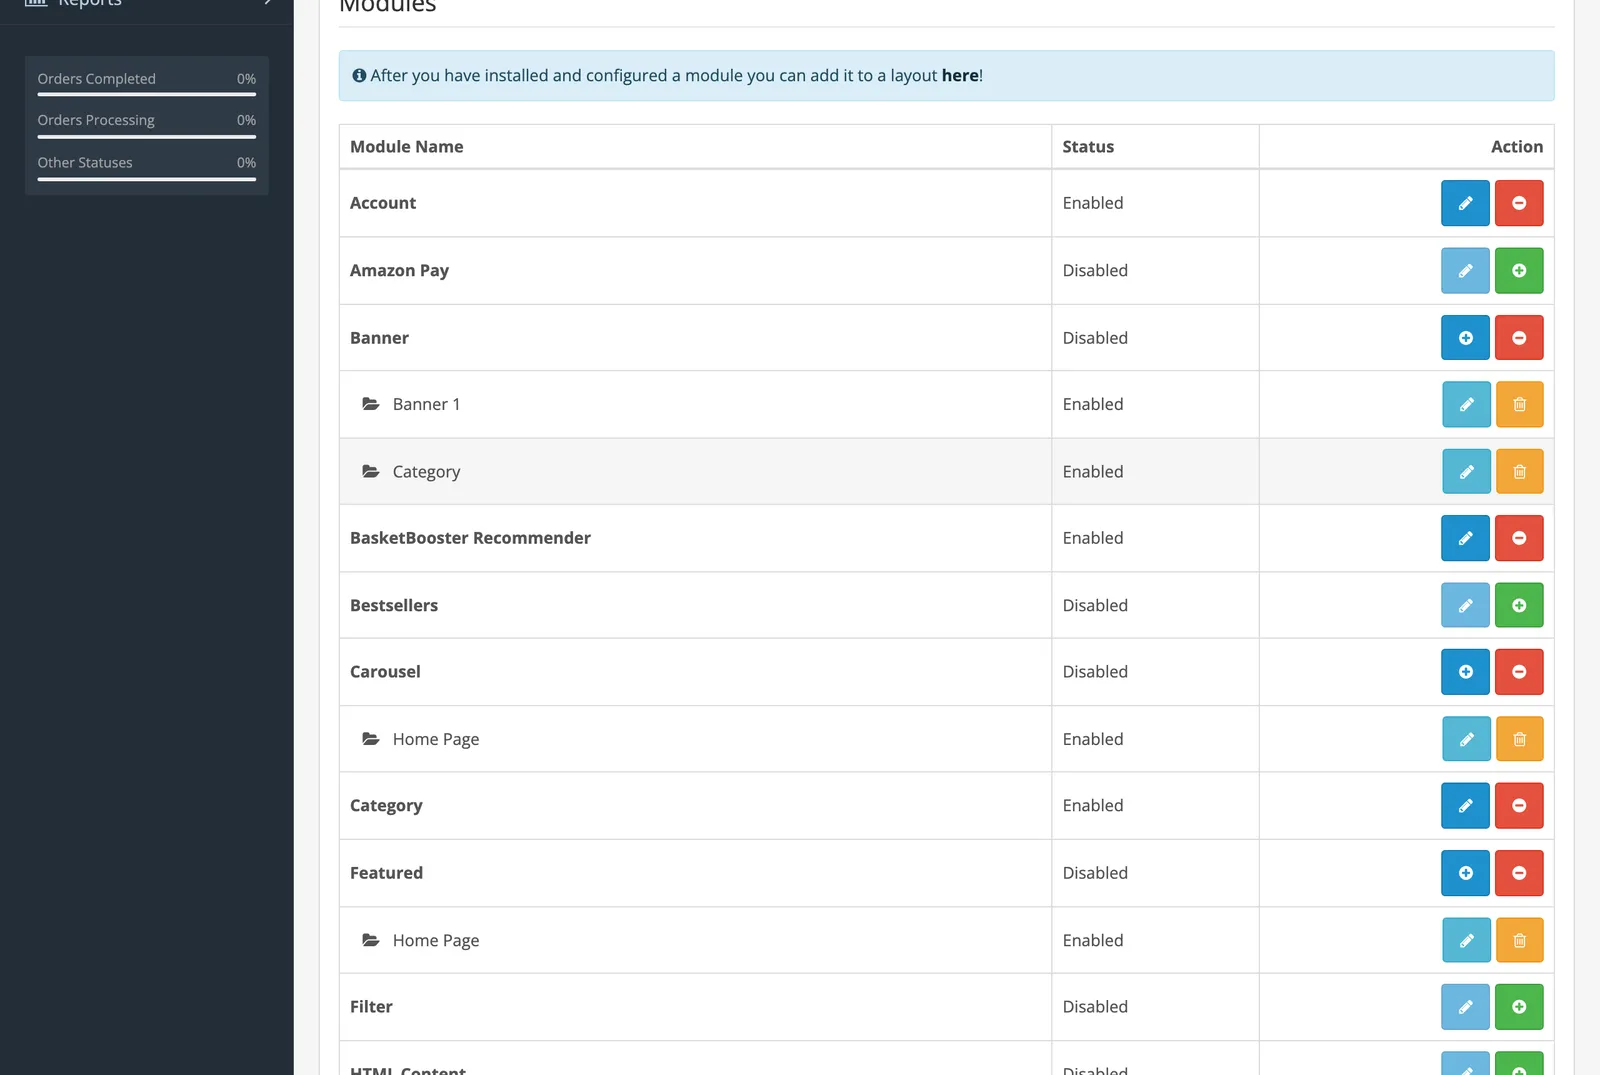
Extensions > Extensions > Modules. - 3
Paste the two keys
Set Status to Enabled, leave the API base URL at
https://api.basketbooster.eu, paste the publishable key and the secret API key, and save. The page reloads and stays on the settings, so you can test right away.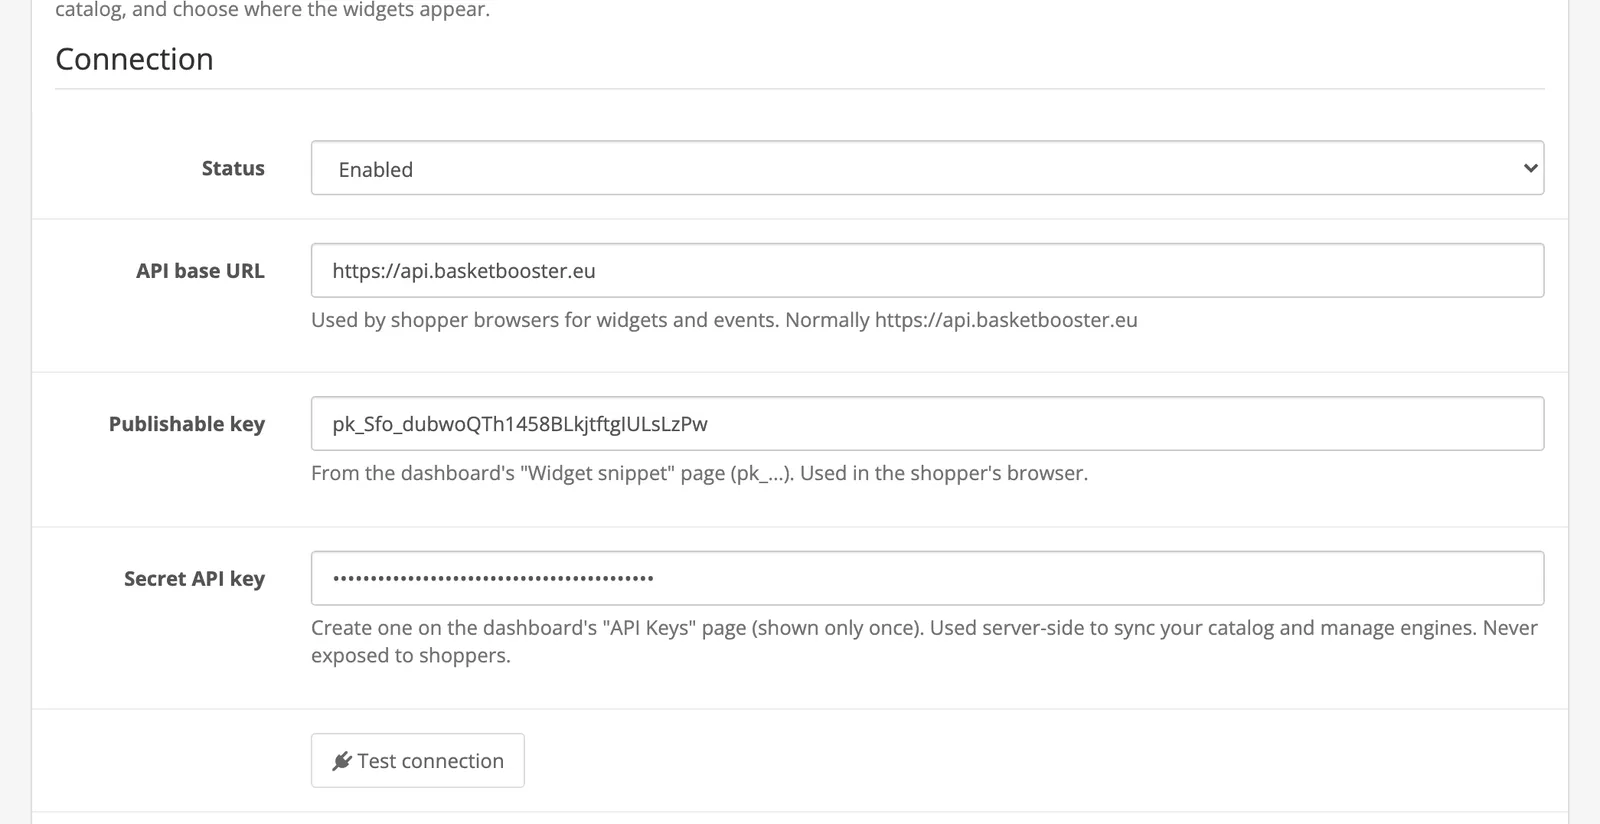
The Connection section: Status is a list on OpenCart 3. - 4
Test the connection
Click Test connection. A green result means both keys work and registers the extension with your account.
- 5
Sync your catalog
Scroll to Catalog sync and click Sync now. Every enabled product of your default store is pushed, and from then on saving or deleting a product in the admin syncs it right away.
Copying a product does not trigger a sync, because OpenCart creates copies disabled. The copy is synced when you edit and enable it. There are no variants in OpenCart 3, so every product is one catalog item; the SKU field is used, falling back to the model.
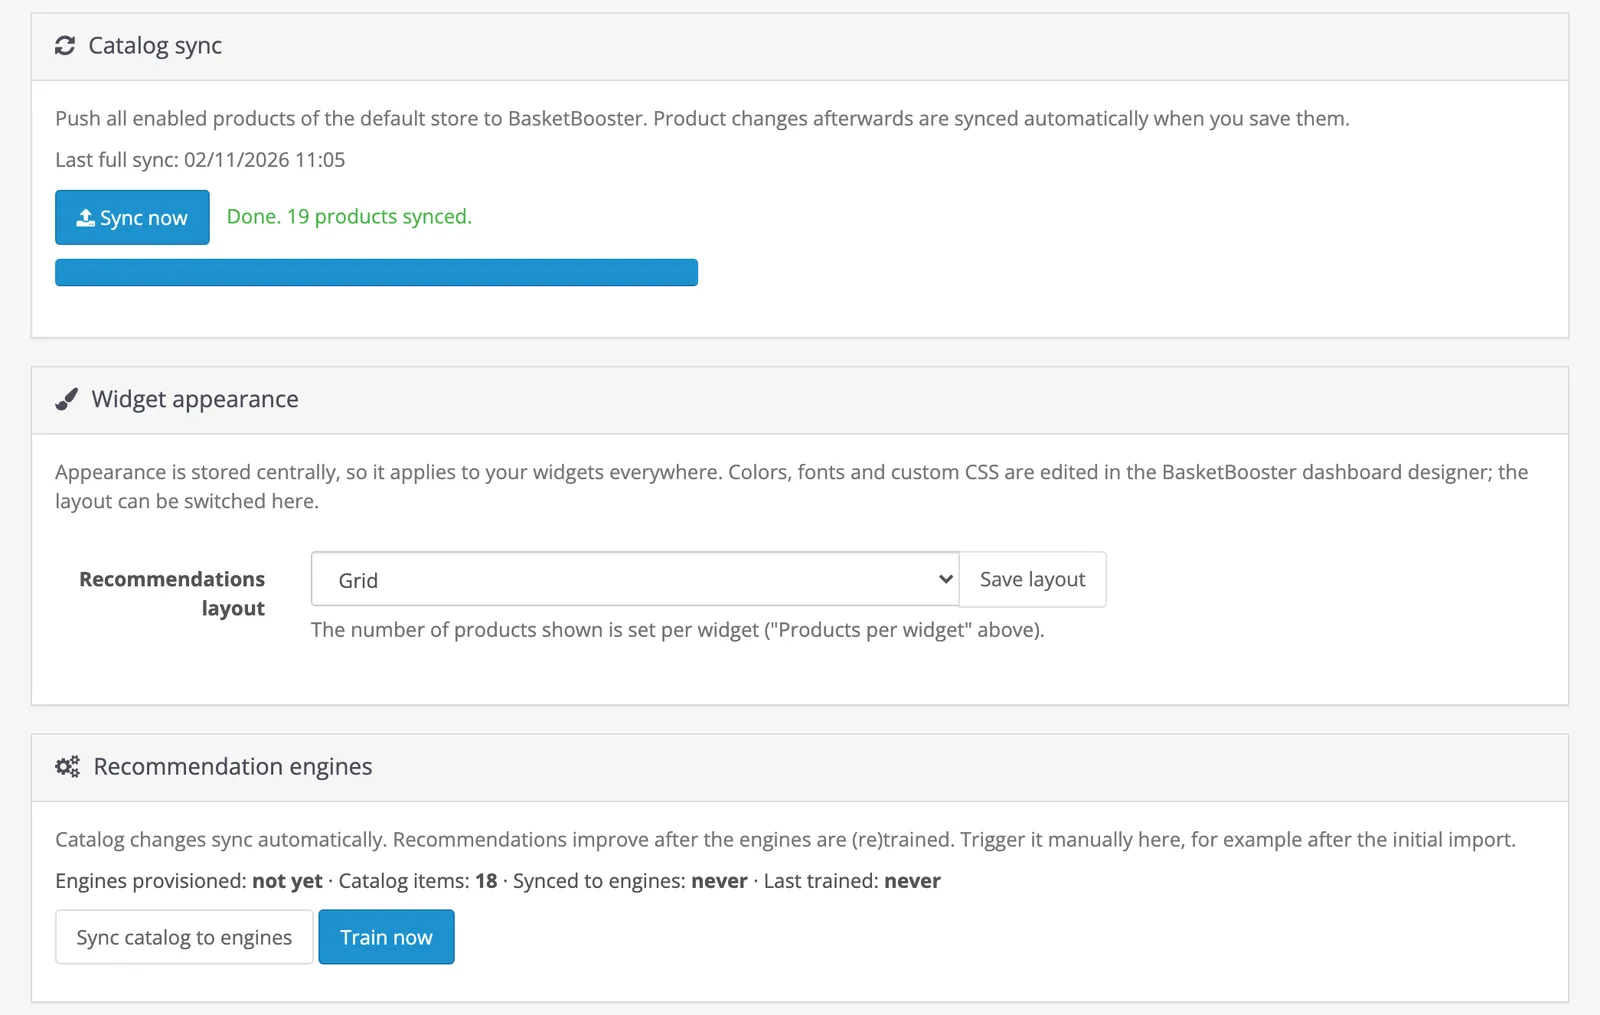
Catalog sync after the first run. - 6
Check a product page
Open any product in your store. The “You may also like” grid appears under the product details and the home page shows trending products.
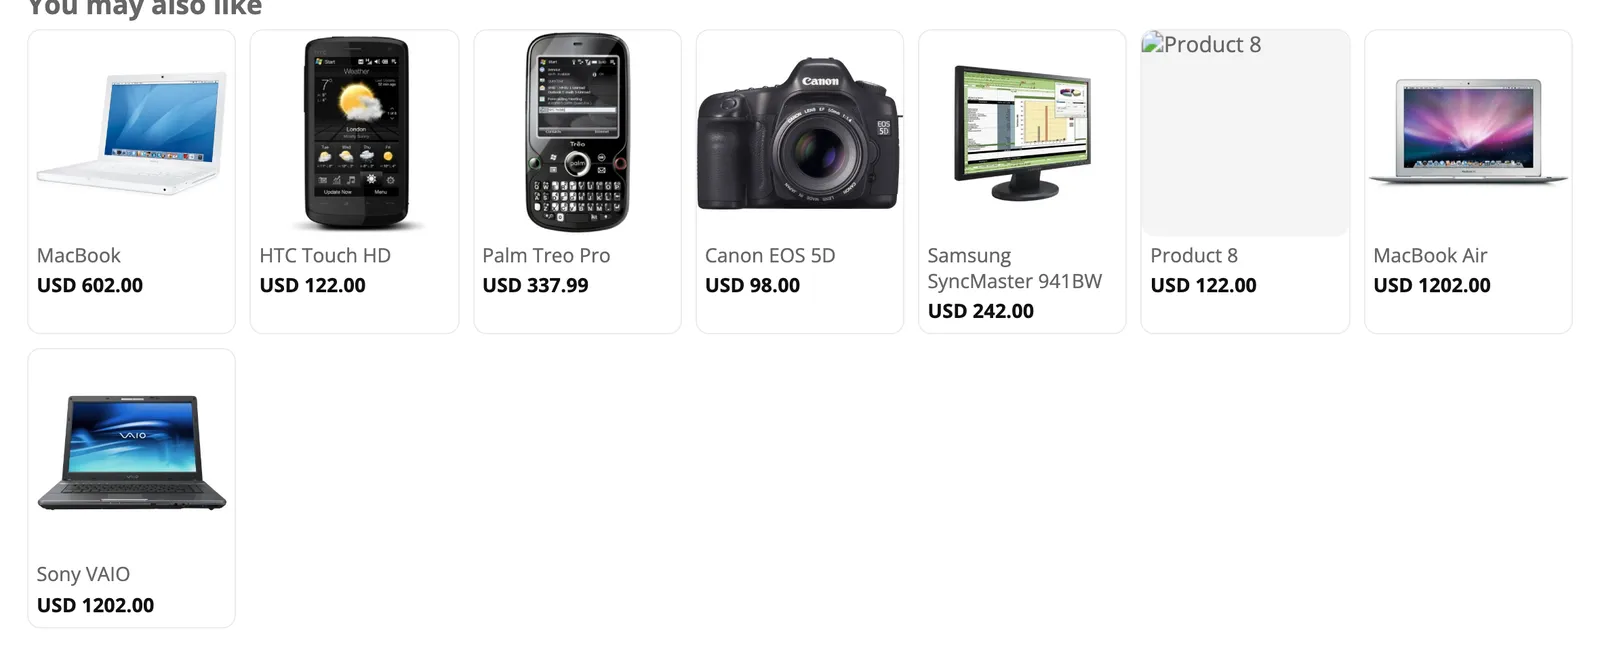
The widget on an OpenCart 3 product page.
Where the widgets appear
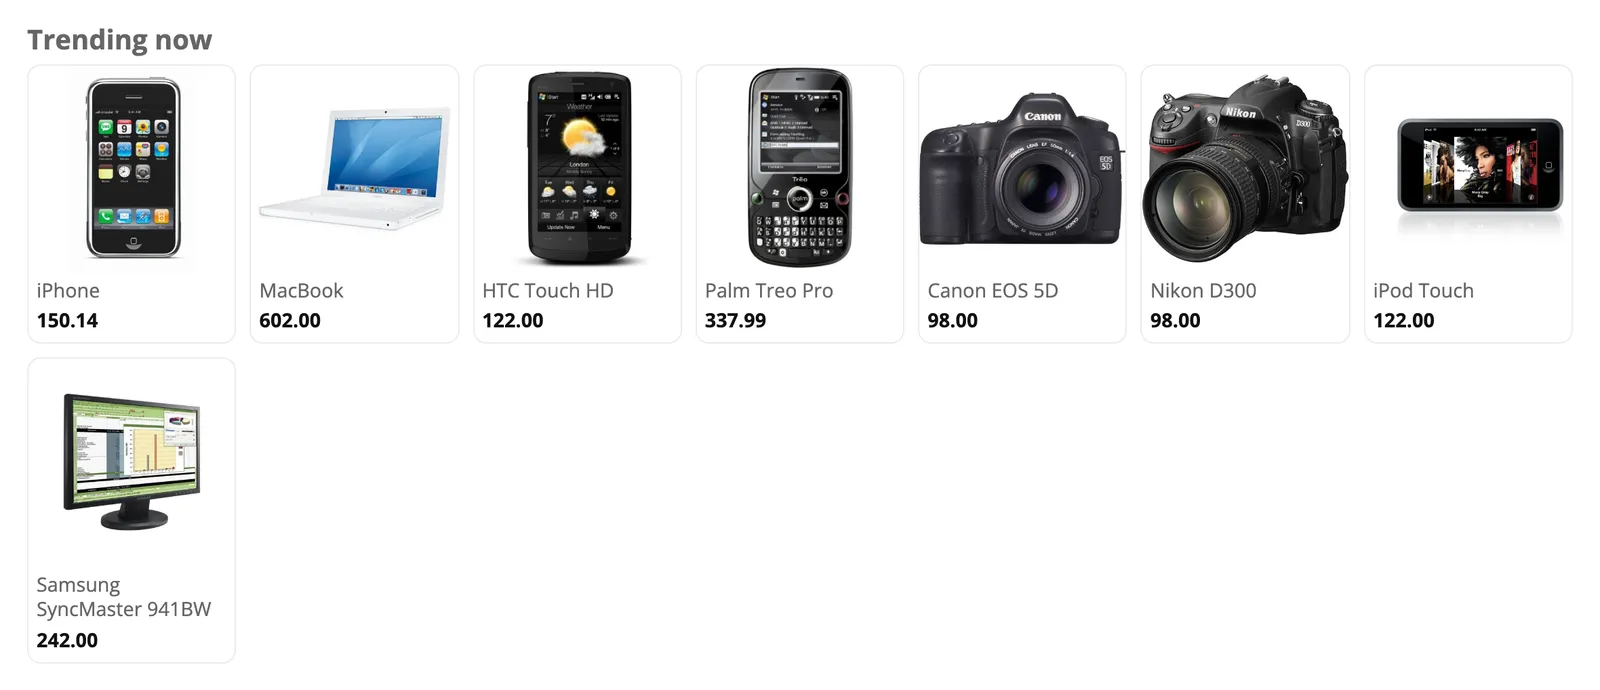
Placements work exactly like the OpenCart 4 build: the Automatic placements checkboxes add the module to the matching layouts under Design > Layouts at the position you choose.
Product pages
“You may also like” for the viewed product, with OpenCart’s own Related Products hidden unless you keep it.
Cart page
“Frequently bought together”, seeded by the last item added.
Home page
Trending products for the whole store.
Category pages
Off by default. Trending products of the viewed category.
Order success page
Trending products after the purchase.
Themes
The widget template lives in the default theme folder and OpenCart falls back to it for other themes. To change the markup, copy catalog/view/theme/default/template/extension/module/basketbooster.twig into your theme’s folder.
Settings that control them
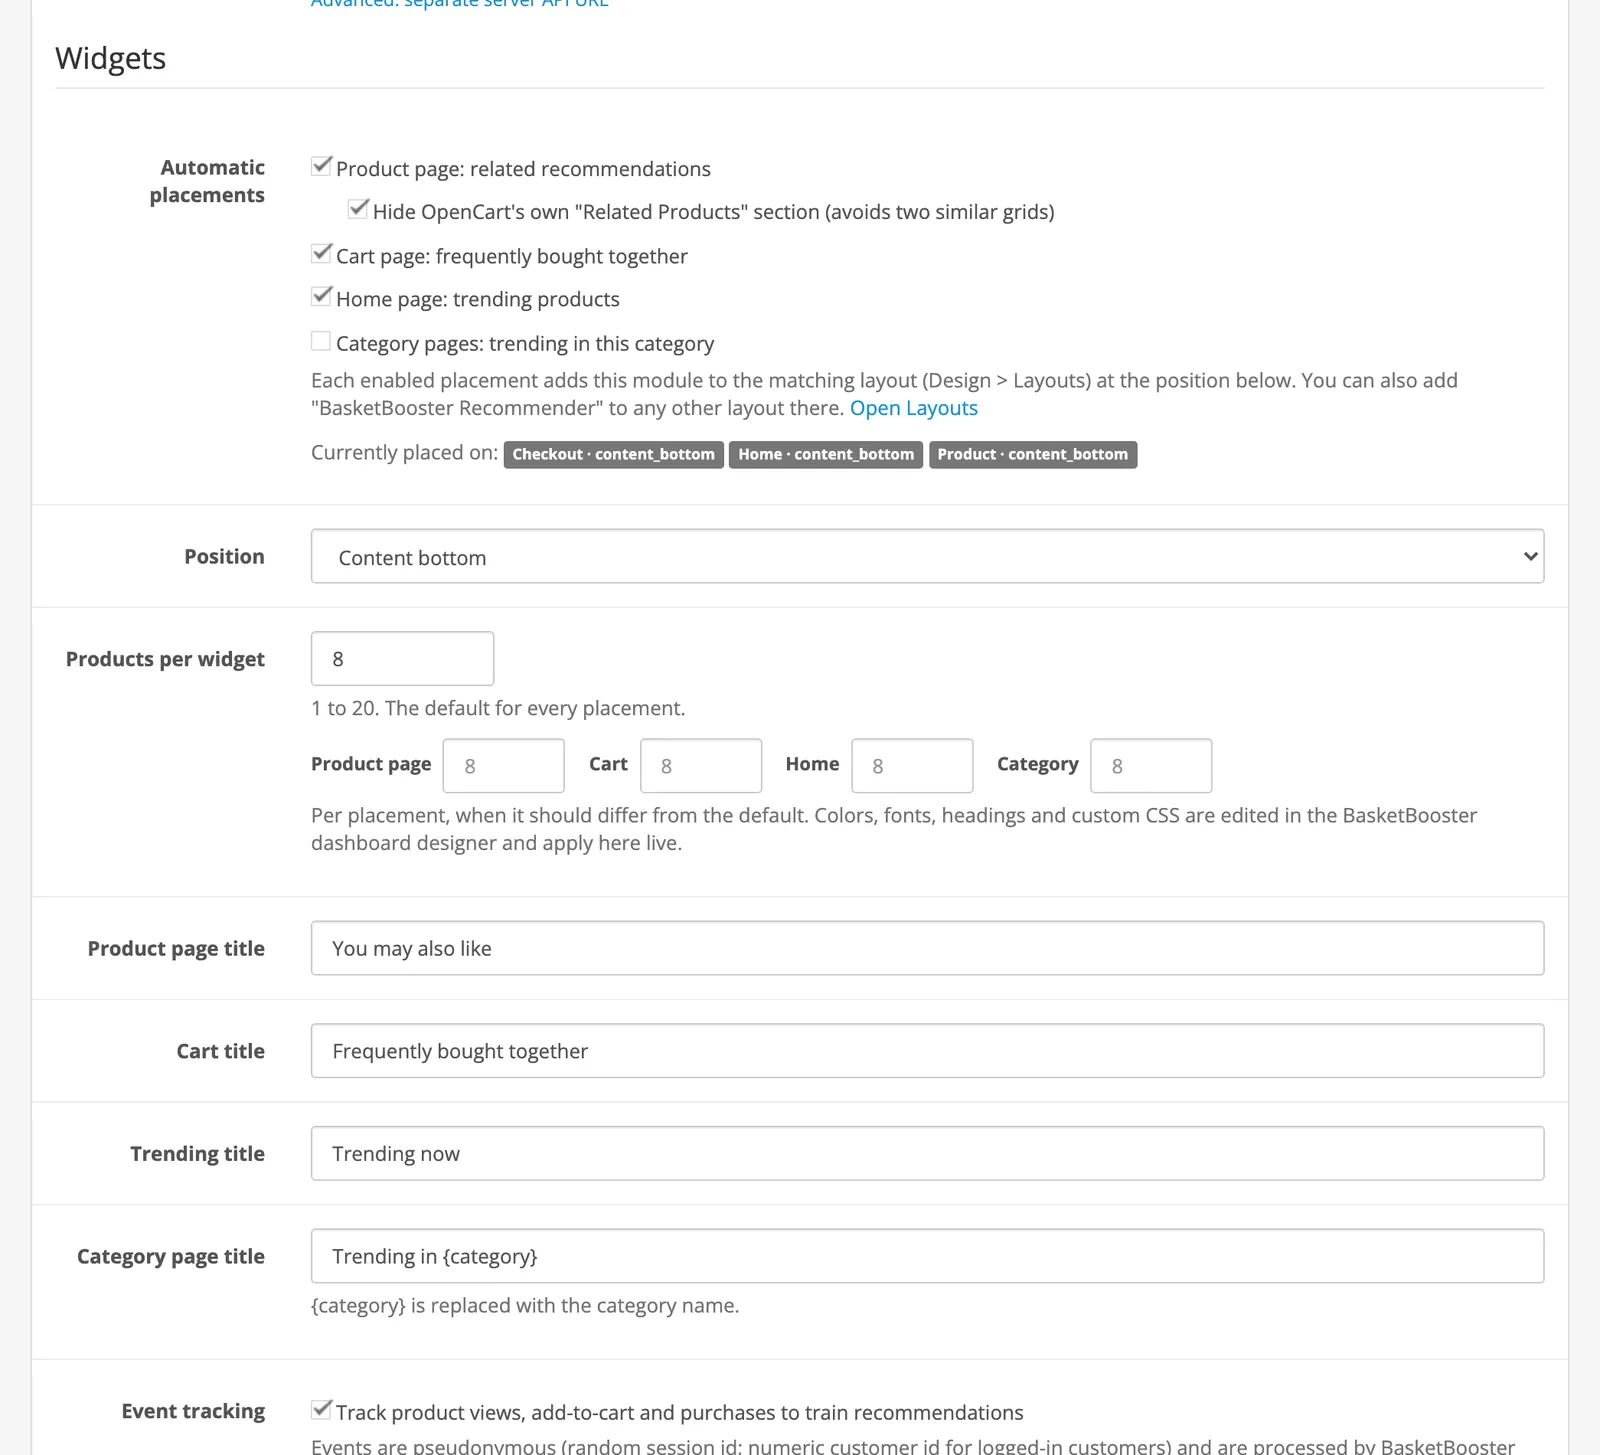
The settings page is the same as on OpenCart 4, with two differences: Status is an Enabled/Disabled list, and customer events run through a cron URL instead of OpenCart’s cron jobs.
Set up Email Flows.
Email Flows sends automated emails through your own Resend or Brevo account: abandoned cart, welcome, restock and eight more ready-made flows. It is part of the Scale plan and works with all three plugins on this page.
Step by step
- 1
Sync your contacts
Switch on Sync contacts and save. In WooCommerce it is under WooCommerce > BasketBooster. In OpenCart it is under Email Flows on the extension’s settings page. The plugin imports your existing customers once, 200 at a time, and from then on sends each new registration, edited email or name and change of consent as it happens. Deleting a customer erases the contact.
Guest checkouts are not sent. Who counts as subscribed follows the Who may be emailed setting: by default, customers with
bbr_marketing_consent = yesin WooCommerce and customers subscribed to the newsletter in OpenCart. In OpenCart the import and the unsubscribe check run on the extension’s cron, so make sure it is working. On 3.0.x that means adding the cron URL from the settings page to your server’s cron. - 2
Connect Resend or Brevo
In the BasketBooster dashboard open Automation > Sending. Choose the provider and paste your own API key: a key with sending access for Resend, a v3 API key for Brevo. Set the sender name and address, then switch sending on. The address has to belong to a domain you verified with the provider, otherwise sending stays off.
Add the webhook address shown on that page as a webhook in your provider account, so bounces, complaints, opens and clicks come back. For Resend, also paste the signing secret it gives you. Without the webhook emails still go out, but bounced addresses are not suppressed for you.
- 3
Set your sending rules
On the same page, set quiet hours in your timezone and the frequency cap: the minimum number of hours between two emails to the same person, across all flows. The default is 16. An email due during quiet hours waits until they end.
- 4
Review a ready-made flow
Open Automation > Flows. Your account already holds 11 drafts, one for each trigger, each with its own email template in your account’s language. Open one, read the email and change the text until it sounds like your store. The preview and the test send show it with sample data and your real best sellers.
A test send only goes to the address of someone with a login on your BasketBooster account. You can delete the flows you do not need, and they are not created again.
- 5
Fill in or remove the coupon block
The welcome, abandoned cart, late usual order, at risk, drifting away and best customers flows include a coupon block with the code left empty. Type in a code you created in your store, switch the block to a separate code for each customer, or remove the block if you would rather send no offer.
- 6
Publish
Click Publish. BasketBooster checks the draft and turns the flow on. It will not publish while an email has an empty coupon code or another unfinished block. If you edit a live flow and publish again, new customers get the new version and customers already inside finish the one they started.
Pause stops new customers entering and holds everyone where they are. Automation > Email activity lists every email with its status.
Discount codes
A coupon block works in one of two ways. With a separate code for each customer, your store has to know the code before it can take money off an order. The plugins take care of that.
One code for everyone
Create a coupon in your store and type its code into the block. Every recipient sees the same code, and nothing else is needed.
A separate code for each customer
Set the rules in the block and BasketBooster creates a new code every time the email is sent: a percentage off the order or a fixed amount in your store currency, how many orders the code works for (1 for once, 0 for no limit), the number of days until it expires (1 to 365, 14 by default) and a prefix, so SAVE gives a code like SAVE-7K3MQ9XD.
WooCommerce, plugin 0.6.0
You do not create these codes in WooCommerce. The first time a shopper enters one, the plugin checks it with BasketBooster and creates a normal coupon with the same rules, restricted to that customer’s email address. After that it is an ordinary coupon under Marketing > Coupons, which you can edit or delete. Orders that use it are reported back, so the dashboard can count them. This runs only while Sync contacts is on.
OpenCart, extension 0.3.0
The same happens in the cart on OpenCart 4 and 3.0.x. The coupon appears under Marketing > Coupons, named BasketBooster: CODE. OpenCart cannot tie a coupon to one customer, so the extension does that part: a personal code works only while its owner is logged in. Keep the prefix to 11 characters or fewer and enable the Coupon order total under Extensions > Order Totals. A fixed-amount code is in your store’s default currency.
Before you publish
A flow that uses a code per customer cannot be published until your store runs a plugin version that supports them: WooCommerce 0.6.0 or OpenCart 0.3.0. If you update OpenCart from an earlier version, upload the new zip and save the settings page once with Sync contacts on. That tells BasketBooster your store accepts these codes.
Custom stores
Use the /coupons API with your secret key. When a shopper enters a code your store does not know, call GET /coupons/{code} and apply it only when its status is active. After the order, call POST /coupons/{code}/redeem. If your store must know a code before the shopper arrives, switch to confirm mode: poll GET /coupons?unconfirmed=true, create each code and call POST /coupons/ack. Each email then waits for its code to be confirmed, for up to 30 minutes.
What the plugin versions add
WooCommerce plugin
Version 0.5.0 added contact sync for Email Flows. Every hour it also checks who unsubscribed through an email, bounced or complained, and sets their bbr_marketing_consent to no. Version 0.6.0 adds a separate discount code for each customer, accepted at checkout with no setup. If a flow is live for became at risk or replenishment due, the plugin skips its own email for that event, so the customer is not mailed twice.
OpenCart 4 and 3.0.x extension
Version 0.2.0 added contact sync in both builds. On every cron run it also checks who unsubscribed, bounced or complained and switches off their newsletter subscription in OpenCart. Version 0.3.0 adds a separate discount code for each customer, checked when a shopper enters it in the cart. As in WooCommerce, the extension skips its own win-back or reminder email when a flow is live for the same event.
What Email Flows does, the 11 ready-made flows and what is stored are on the Email Flows page.
The four things to check first.
Widgets not visible
Confirm the Status switch is on (OpenCart) or the plugin is active (WooCommerce), the publishable key is saved and, on OpenCart, the module is placed on the layout under Design > Layouts. Then check the browser console on a product page.
Sync errors
They are shown word for word on the settings page. The most common cause is an expired trial with no plan selected (402 billing_inactive). Pick a plan on the dashboard’s Billing page.
Mixed content
An HTTPS store must use the HTTPS API base, because browsers block http:// calls from https:// pages. The settings page warns about this.
Product edits not syncing
On OpenCart the extension’s events must be enabled under Extensions > Events (they are created on install). Errors go to the OpenCart error log under System > Maintenance.
The full plugin guides, the embed reference and the API live in the developer docs.
Ten minutes from zip to first recommendation.
Start the trial, download the plugin for your store and paste two keys. 30 days free, no card.